


Troubleshoot Switch Joy-Con drift: Quick fixes before repair?
The dreaded “Joy-Con drift” has become a frustrating reality for many Nintendo Switch owners, causing characters to move on their own, cameras to pan unexpectedly, and general gameplay chaos. Before you resign yourself to buying new controllers or sending them off for repair, there are several quick fixes and troubleshooting steps you can try. This guide will walk you through common solutions that might just save your game – and your wallet.

Understanding Joy-Con Drift
Joy-Con drift occurs when the console registers input from the joystick even when it’s not being touched. This phantom input is typically caused by wear and tear on the internal components of the joystick, such as the contact pads or springs, or by dust and debris accumulating under the joystick’s skirt. While Nintendo has acknowledged the issue and even offered free repairs in some regions, attempting a few at-home fixes first can often resolve minor cases of drift.
Initial Troubleshooting Steps
1. Calibrate Your Joy-Cons
One of the simplest and most effective first steps is to recalibrate your joysticks. This tells your Switch the neutral position of your controllers.
- From the Switch HOME Menu, select System Settings.
- Scroll down the menu on the left and select Controllers and Sensors.
- Select Calibrate Control Sticks.
- Press the control stick you wish to calibrate.
- Follow the on-screen prompts to check the stick’s response and then calibrate it if needed.

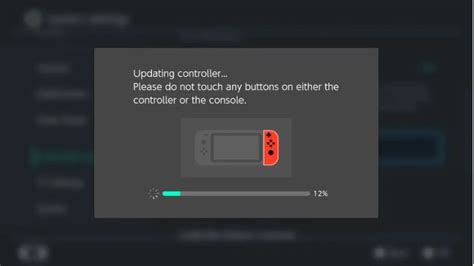
2. Update Your System and Controller Firmware
Ensuring both your Nintendo Switch system and Joy-Con controllers have the latest firmware can sometimes resolve unexpected issues, including drift that might be related to software glitches rather than hardware.
- For the system: Go to System Settings > System > System Update.
- For controllers: Go to System Settings > Controllers and Sensors > Update Controllers.
3. Check for Software Interference
Occasionally, issues can arise from specific games or software. Test your Joy-Cons in multiple games to determine if the drift is universal or specific to a particular application.
DIY Cleaning and Advanced Tips
If calibration and updates don’t work, it’s time to get a little more hands-on. Be cautious with these steps and proceed at your own risk, as improper cleaning can sometimes exacerbate problems.
1. Clean Around the Joystick Base
Dust, dirt, pet hair, and other debris can accumulate under the flexible skirt of the joystick, interfering with its movement and sensors. Using a can of compressed air is often recommended.
- Turn off your Switch.
- Carefully lift the rubber skirt around the base of the control stick.
- Hold the compressed air can upright and use short bursts to blow air around the base of the stick. Move the stick in various directions while blowing to dislodge any debris.
- Avoid using strong, direct streams of air that could push debris further in or damage components.

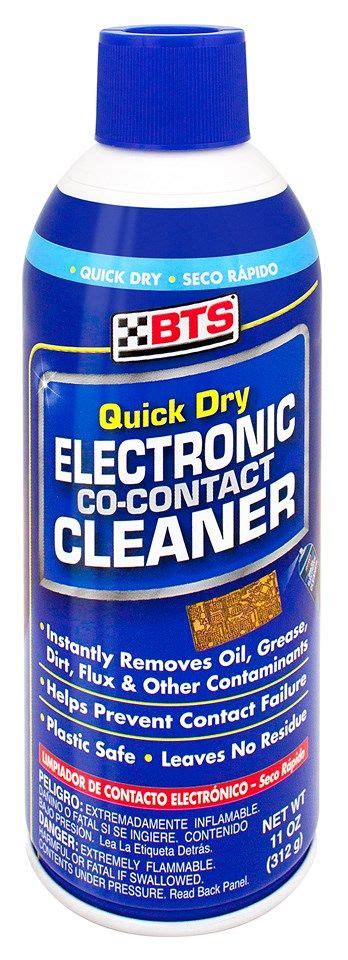
2. Use Electrical Contact Cleaner (with extreme caution)
For more stubborn cases, some users have reported success with electrical contact cleaner (like WD-40 Specialist Contact Cleaner, NOT regular WD-40). This solution is designed to clean electrical components without leaving residue.
- IMPORTANT: This method carries risks and can potentially damage your Joy-Cons if not done correctly. Proceed with extreme caution and at your own risk.
- Remove the Joy-Con from the Switch and power off the console.
- Lift the rubber skirt around the joystick base.
- Apply a tiny amount (a quick, short spray) of contact cleaner into the base of the joystick.
- Immediately move the joystick around in circles for about 30 seconds to work the cleaner in.
- Allow the Joy-Con to dry completely (at least 15-30 minutes) before reattaching it to the Switch or powering on.
When Professional Repair is Necessary
Despite all your efforts, if the drift persists or worsens, it’s likely a more significant hardware failure. At this point, you have a few options:
- Nintendo Repair Service: Check Nintendo’s official website for your region’s repair policy. Many regions offer free repairs for Joy-Con drift, even out of warranty.
- Third-Party Repair Shops: Local electronics repair shops may offer services, but ensure they are reputable.
- Replacement: If repairs are too costly or inconvenient, purchasing new Joy-Cons or a pro controller might be the best long-term solution.
Conclusion
Joy-Con drift is a frustrating issue, but it doesn’t always mean your controllers are beyond saving. By following these troubleshooting and cleaning tips, you stand a good chance of resolving the problem yourself. Remember to proceed with caution when attempting any DIY hardware fixes. If all else fails, Nintendo’s official repair service is often the most reliable path to a permanent solution, ensuring your Switch gameplay remains smooth and drift-free.


