


How to fix Joy-Con drift on Nintendo Switch? DIY repair tips?
Joy-Con drift is arguably one of the most frustrating issues faced by Nintendo Switch owners. It manifests as unintended input, making your character move without touching the stick, or menus scroll on their own. This phantom input can severely impact gameplay, turning an enjoyable session into a test of patience. Fortunately, there are several steps you can take to try and fix it yourself before resorting to costly replacements or professional repairs.
Understanding Joy-Con Drift and Its Causes
At its core, Joy-Con drift occurs when the console registers movement from the analog stick even when it’s physically in a neutral position. This can be due to a variety of factors, but the most common culprits are wear and tear, dust and debris accumulation under the stick housing, or manufacturing defects in the potentiometer (the component that translates physical stick movement into electrical signals).
Over time, the delicate contact points inside the analog stick can degrade, leading to inconsistent readings. Dust, lint, or other small particles can also get trapped, interfering with the contacts and causing erroneous inputs. While Nintendo has acknowledged the issue and offers repairs under warranty in some regions, many users prefer to attempt a DIY fix.

Simple Software Solutions to Try First
Before you open up your Joy-Con or use any cleaning products, it’s wise to rule out any software-related glitches. These steps are quick, easy, and require no tools.
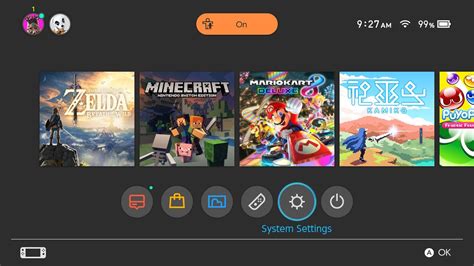
1. Recalibrate Your Control Sticks
- From the Switch HOME Menu, select System Settings.
- Scroll down and select Controllers and Sensors.
- Select Calibrate Control Sticks.
- Follow the on-screen instructions to select the Joy-Con you want to calibrate and then tilt the stick to register its movement.
2. Update Your Joy-Con Firmware
- Ensure your Nintendo Switch system is up to date (System Settings > System > System Update).
- With Joy-Cons attached to the console, go to System Settings > Controllers and Sensors > Update Controllers.
Sometimes, a simple firmware update can resolve minor input issues by improving calibration or responsiveness.
DIY Cleaning: Tackling Physical Obstructions
If software fixes don’t work, the problem is likely physical. The most common physical cause is debris or wear around the base of the analog stick.
1. Compressed Air or Contact Cleaner
This is the least invasive physical repair. You’ll need a can of compressed air or an electronics contact cleaner (like isopropyl alcohol spray, specifically designed for electronics and quick evaporation).
- Carefully peel back the rubber skirt around the base of the analog stick. You don’t need to remove it entirely, just enough to expose the gap underneath.
- Hold the Joy-Con upside down to allow gravity to help.
- Spray short bursts of compressed air or contact cleaner into the exposed gap. Be careful not to drench the internal components.
- Wiggle the stick around to help dislodge any debris and distribute the cleaner.
- Allow the Joy-Con to dry completely (if using cleaner) before testing. Repeat the calibration process after cleaning.
This method often works because it clears out the dust and grime that interfere with the stick’s sensors.

Advanced DIY: Replacing the Analog Stick Module
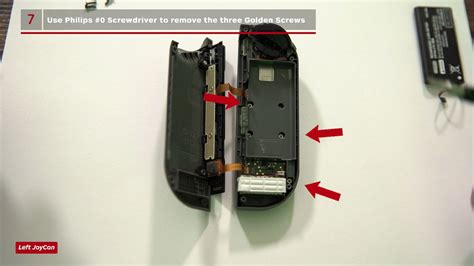
If cleaning doesn’t resolve the drift, the analog stick module itself might be faulty and need replacement. This is a more involved repair and requires opening the Joy-Con, which carries a risk of voiding your warranty (if applicable) and potentially damaging other components. Proceed with caution.
What You’ll Need:
- Small Phillips head screwdriver (PH00 or PH000)
- Tri-wing screwdriver (Y00 or Y000) – essential for Nintendo screws
- Tweezers
- Spudger or thin plastic opening tool
- Replacement analog stick module (available online)
General Steps (Consult a detailed video guide!):
- Power off your Switch and detach the Joy-Cons.
- Remove the four tri-wing screws from the back of the Joy-Con.
- Carefully open the Joy-Con casing. Be aware of ribbon cables connecting the two halves.
- Disconnect the battery and remove it.
- Unscrew the Phillips head screws holding the mid-frame and the stick module in place.
- Carefully disconnect the ribbon cable of the faulty analog stick and remove it.
- Install the new analog stick, reconnect its ribbon cable, and reassemble the Joy-Con in reverse order.
- Test and recalibrate the new stick.
This repair can be daunting for beginners, but it’s often the most effective solution for persistent drift if cleaning fails. There are many excellent video tutorials online that can walk you through the process step-by-step.
When to Consider Professional Repair or Replacement
If you’ve tried all the DIY methods and your Joy-Con still drifts, it might be time to consider sending it to Nintendo for repair (especially if still under warranty or if Nintendo’s free repair program applies in your region). Alternatively, purchasing a new pair of Joy-Cons or a pro controller might be the best long-term solution, especially if you’re uncomfortable with internal hardware repairs.
While frustrating, Joy-Con drift is a manageable problem. With a bit of patience and the right approach, you can often restore your controllers to perfect working order and get back to enjoying your Nintendo Switch games without phantom movements.


