


Switch storage full? Best SD card for digital games & tips to free up space.
The Ever-Growing Digital Library Dilemma
The Nintendo Switch, a fantastic console for gaming on the go or at home, comes with a common challenge for many players: limited storage. With only 32GB of internal memory (or 64GB for the OLED model), a significant portion of which is reserved for the system, it doesn’t take long for digital game downloads, updates, and screenshots to eat up that space. Suddenly, you’re faced with the dreaded message: ‘Not enough free space.’ But don’t despair! Expanding your Switch’s storage is straightforward, and there are many ways to reclaim precious gigabytes.
Understanding Nintendo Switch Storage Basics
Your Nintendo Switch has a finite amount of built-in storage. System software, updates, and essential data take up a good chunk of this immediately. What’s left is for your games, downloadable content (DLC), save data, screenshots, and video captures. While game save data is small and stored internally (and cannot be moved to an SD card), digital games themselves can be massive, often exceeding 10-20GB each. Physical game cartridges don’t install the full game to your internal storage, but they still require space for updates and DLC.
Why Your Switch Storage Fills Up So Fast
The primary culprit for a full Switch is often digital game downloads. Titles like The Legend of Zelda: Tears of the Kingdom or Pokémon Scarlet/Violet are significant downloads. Add to that the constant updates many games receive, plus any DLC you purchase, and your available space quickly dwindles. Even if you primarily buy physical games, those mandatory updates and any digital purchases can quickly become problematic.
Choosing the Best SD Card for Your Nintendo Switch
The solution to storage woes is a microSD card. But not just any card will do. You need one that’s reliable, fast, and offers ample capacity. The Nintendo Switch supports microSD (up to 2GB), microSDHC (up to 32GB), and microSDXC (up to 2TB) cards. For modern gaming, microSDXC is the standard, offering the largest capacities.
Key Factors to Consider:
- Capacity: Aim for at least 128GB, but 256GB or 512GB provides much more breathing room for a growing game library. 1TB cards are also available for avid digital collectors.
- Speed: This is crucial for smooth gameplay and fast loading times. Look for cards with a ‘UHS-I’ classification and a ‘U3’ or ‘V30’ speed class. These indicate a minimum write speed of 30MB/s, which is ideal for gaming. While UHS-II cards are faster, the Switch doesn’t fully support their increased speed, so they won’t offer a significant advantage over high-quality UHS-I cards.
- Brand: Stick to reputable brands like SanDisk, Samsung, or Lexar to ensure reliability and performance.
Top Picks for Switch SD Cards
While specific models can vary, these types of cards consistently perform well for the Nintendo Switch:
- SanDisk Extreme / Extreme Pro: Excellent performance and reliability, often available in various capacities.
- Samsung EVO Select / EVO Plus: Great value and dependable speed for the Switch.
- Lexar PLAY microSDXC: Designed for gaming and multimedia, offering good speeds.
Always purchase from trusted retailers to avoid counterfeit cards, which can lead to data loss and poor performance.

Practical Tips to Free Up Switch Space
Even with an SD card, managing your space efficiently is key. Here are some strategies:
- Archive Software: This is your best friend. From the HOME Menu, select the game you want to manage, press ‘+’ or ‘-‘, then choose ‘Manage Software’ > ‘Archive Software’. This deletes the game’s installation data but keeps your save data intact. You can redownload the game later if you wish.
- Delete Old Game Data: If you’re certain you’ll never play a game again and don’t care about its save data (though save data is small and usually stored internally), you can choose ‘Delete Software’ from the ‘Manage Software’ menu. This removes everything related to that game.
- Manage Screenshots and Videos: Over time, those epic moments you captured can add up. Go to ‘System Settings’ > ‘Data Management’ > ‘Manage Screenshots and Videos’. You can delete them or move them to an SD card if they’re currently on internal storage. Consider regularly backing these up to a computer.
- Move Downloaded Software: If you initially downloaded games to your internal storage and now have an SD card, you can move them. Go to ‘System Settings’ > ‘Data Management’ > ‘Move Data Between System / microSD Card’. This is an excellent way to consolidate your games onto your new SD card.
- Clear Cache Data: Sometimes, temporary internet files and cache can take up minor space. While not a massive space saver, it can sometimes help. Go to ‘System Settings’ > ‘System’ > ‘Formatting Options’ > ‘Clear Cache’. Note that this will log you out of eShop accounts and clear browser history.
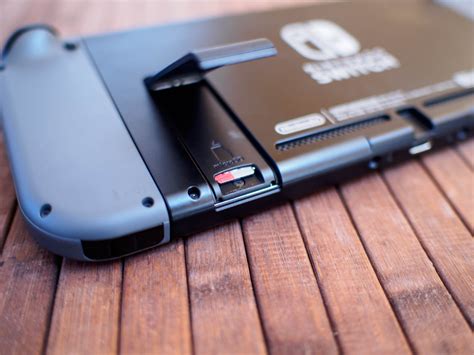
Installing and Managing Your SD Card
Inserting a microSD card is simple: open the kickstand on the back of your Switch and slide the card into the slot until it clicks. The Switch will automatically detect and format it for use. Once installed, your Switch will prioritize downloading new games and updates to the SD card, assuming there’s space. You can always check your storage status via ‘System Settings’ > ‘Data Management’.
Conclusion
Running out of storage on your Nintendo Switch is an inevitable part of being a digital gamer, but it’s a problem with a simple, effective solution. Investing in a high-quality microSDXC card and adopting smart data management habits will ensure you always have room for the next big adventure. Don’t let a full storage message stop you from enjoying your favorite games!