

How to fix Switch Joy-Con drift without sending it for repair?
Nintendo Switch Joy-Con drift is a prevalent and frustrating issue where the controller registers movement even when the analog stick is not being touched. This phantom input can severely impact gameplay, making precision impossible. While sending your Joy-Cons for professional repair is an option, it can be costly and time-consuming. Fortunately, several DIY methods can often resolve or significantly alleviate the problem without ever leaving your home.
Understanding Joy-Con Drift
Joy-Con drift typically stems from two main causes: wear and tear on the internal components of the analog stick, or the ingress of dust, debris, and grime under the stick’s protective skirt. Over time, friction wears down the conductive pads or allows microscopic particles to interfere with the electrical signals, leading to erroneous inputs.
Initial Software Checks and Calibration
1. Update Your Nintendo Switch and Joy-Cons
Always ensure your Nintendo Switch system and connected Joy-Cons are running the latest firmware. Software bugs can sometimes mimic hardware issues.
- From the HOME Menu, select System Settings.
- Scroll down and select ‘System’.
- Select ‘System Update’ to check for and install updates.
- Ensure your Joy-Cons are attached or paired during the update process.
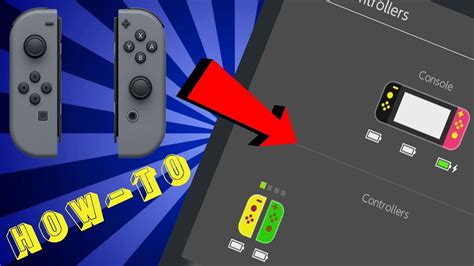
2. Calibrate Your Control Sticks
Before attempting any physical fixes, recalibrating the joysticks is a crucial first step. This process helps the Switch re-learn the neutral position of your sticks.
- From the HOME Menu, select System Settings.
- Scroll down and select ‘Controllers and Sensors’.
- Select ‘Calibrate Control Sticks’.
- Follow the on-screen instructions, tilting the problematic stick in all directions.
Effective Cleaning Methods for Drift
Often, dust and debris are the culprits. Cleaning can work wonders.
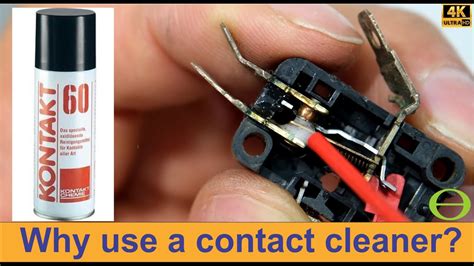
1. The Non-Invasive Contact Cleaner Method
This method involves using an electrical contact cleaner to flush out debris without disassembling your Joy-Cons. It’s often highly effective and low-risk.
- Purchase a can of electrical contact cleaner (ensure it’s plastic-safe and leaves no residue).
- Hold the Joy-Con with the problematic stick pointing upwards.
- Gently lift the rubber skirt at the base of the analog stick.
- Spray a small burst of contact cleaner under the skirt, around the base of the stick.
- Wiggle the stick in all directions for about 30 seconds to distribute the cleaner.
- Allow it to dry completely (a few minutes) before testing. Repeat if necessary.
Advanced DIY Fixes (Proceed with Caution)
If software and basic cleaning don’t work, more involved physical interventions might be needed. These require more care and potentially specialized tools.
1. Cleaning Under the Analog Stick’s Skirt
For persistent debris, you might need to more thoroughly clean under the stick’s “skirt.”
- Carefully lift the black rubber skirt at the base of the analog stick using a thin, non-abrasive tool (like a guitar pick or plastic spudger).
- Use compressed air or a soft brush to remove visible dust and grime.
- Optionally, follow up with a small amount of electrical contact cleaner.
- Gently press the skirt back into place.
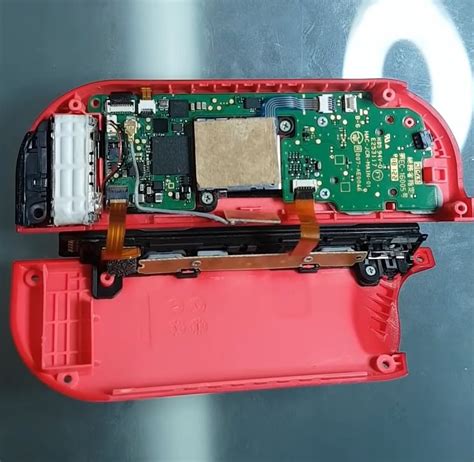
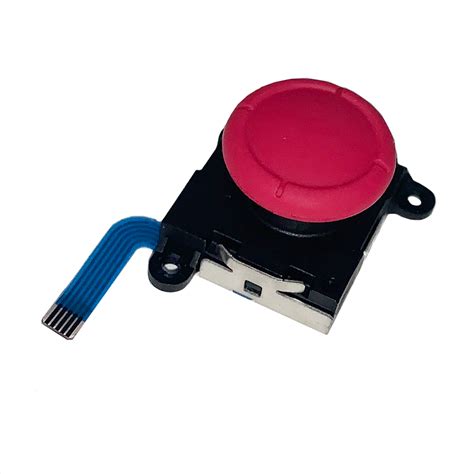
2. Replacing the Analog Stick Module
When all else fails, and the drift is clearly hardware-related, replacing the entire analog stick module is a viable DIY solution. This requires a small repair kit (Y-head screwdriver, Philips head screwdriver, spudger, tweezers) and a replacement stick module.
- Watch detailed video tutorials before starting.
- Carefully open the Joy-Con, following disassembly guides to avoid damaging ribbons and internal components.
- Disconnect the old analog stick module.
- Install the new module.
- Reassemble the Joy-Con, testing functionality before fully closing.
Preventative Measures and Further Tips
- Keep it Clean: Regularly wipe down your Joy-Cons to prevent dust buildup.
- Use Cases: Store your Switch in a protective case to minimize exposure to dust and impacts.
- Gentle Use: Avoid excessive force or “snapping” the sticks, which can accelerate wear.
- Regular Calibration: Periodically recalibrate your controllers even if they’re not drifting.

When DIY Isn’t Enough
If after trying these methods your Joy-Cons still suffer from severe drift, or if you’re uncomfortable with opening the controller, then professional repair or purchasing new Joy-Cons might be your next best step. Nintendo sometimes offers free repairs for drift, even out of warranty, so it’s worth checking their support website.
Tackling Joy-Con drift yourself can be a rewarding way to save money and extend the life of your Nintendo Switch controllers. By starting with simple software solutions and progressing to more involved cleaning or replacement, many users can effectively resolve this common gaming frustration.