


How to effectively fix Nintendo Switch Joy-Con drift yourself?
Understanding Nintendo Switch Joy-Con Drift
Nintendo Switch Joy-Con drift is a frustrating issue where your in-game character or cursor moves without any input from you, often leading to unintended actions and a compromised gaming experience. This phenomenon is primarily caused by wear and tear on the analog stick’s internal components, dust accumulation, or minor misalignment within the joystick mechanism. While Nintendo offers repair services, many users prefer to tackle the problem themselves, and with the right tools and knowledge, it’s a surprisingly manageable task.
Initial Troubleshooting Steps: Calibration and Updates
Before diving into physical repairs, it’s crucial to rule out software-related issues. Sometimes, a simple recalibration or system update can resolve minor drift problems. These steps are quick, easy, and require no tools:
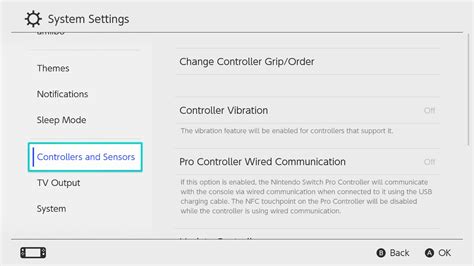
- Update Your System and Joy-Cons: Go to System Settings > System > System Update to ensure your console is running the latest firmware. Then, go to Controllers and Sensors > Update Controllers.
- Calibrate Control Sticks: In System Settings, navigate to Controllers and Sensors > Calibrate Control Sticks. Follow the on-screen instructions to check the stick’s response and recalibrate if necessary. If the calibration screen shows the crosshairs moving on their own, you definitely have drift.
- Test Other Joy-Cons: If you have another set of Joy-Cons, try them to see if the problem persists. This helps determine if the issue is with the specific Joy-Con or potentially the console itself (though console issues are rare for drift).
The Cleaning Method: Tackling Dust and Debris
Often, dust, lint, or other debris can get trapped under the joystick skirt, interfering with the contacts and causing drift. A thorough cleaning can sometimes be all that’s needed.
Tools You’ll Need:
- Small Phillips-head screwdriver (PH00 or PH000)
- Opening pry tools (plastic spudger or guitar pick)
- Isopropyl alcohol (90% or higher)
- Cotton swabs or Q-tips
- Canned air (optional, but helpful)
Steps for Cleaning:
- Power Off Your Switch: Always power down your console completely before beginning any repair.
- Remove Back Screws: Unscrew the four tri-wing screws on the back of the Joy-Con and the single Phillips-head screw on the bottom.
- Carefully Open the Shell: Using your pry tool, gently separate the front and back shells. Be extremely careful, as ribbon cables connect the two halves. Do not pull them apart forcefully.
- Locate the Joystick: Once open, you’ll see the joystick module.
- Clean Around the Base: Liberally apply isopropyl alcohol to a cotton swab and thoroughly clean around the base of the joystick, particularly under the rubber skirt. You might need to gently lift the skirt with a plastic tool while cleaning. Move the stick around to allow the alcohol to penetrate.
- Allow to Dry: Let the alcohol evaporate completely (this usually takes a few minutes). You can use canned air to speed up drying, but hold the can upright to avoid liquid propellant.
- Reassemble and Test: Carefully reassemble the Joy-Con, ensuring all cables are seated correctly. Power on your Switch and test the joystick in the calibration menu.

Replacing the Joystick Module: A More Involved Solution
If cleaning doesn’t resolve the drift, the internal components of the joystick module are likely worn out, and replacement is the most effective solution. This requires a bit more dexterity and the right replacement parts.
Additional Tools You’ll Need:
- Replacement Joy-Con joystick module (ensure it’s compatible with your Joy-Con side, left or right)
- Tweezers (for delicate ribbon cables)
Steps for Replacement:
- Prepare the Joy-Con: Follow steps 1-3 from the cleaning method to open the Joy-Con.
- Disconnect Battery (Right Joy-Con Only): For the right Joy-Con, you’ll need to carefully disconnect the battery to access the joystick. Gently pry it out and disconnect its connector from the motherboard.
- Remove the Joystick Module: Locate the metal plate holding the joystick in place. Unscrew the two small Phillips-head screws securing it.
- Disconnect Ribbon Cable: Carefully use tweezers or a plastic spudger to flip up the small retaining flap on the ZIF connector holding the joystick’s ribbon cable. Then, gently pull the ribbon cable out.
- Remove Old Joystick: The old joystick module can now be lifted out.
- Install New Joystick: Place the new joystick module into position. Gently slide its ribbon cable into the ZIF connector and flip down the retaining flap to secure it.
- Secure with Metal Plate: Place the metal plate back over the new joystick and screw it down.
- Reconnect Battery (If Applicable): If you disconnected the battery, reconnect it now.
- Reassemble and Test: Carefully close the Joy-Con, ensuring no cables are pinched. Screw it back together and power on your Switch. Immediately go to the calibration menu to test the new joystick. You might need to recalibrate it after replacement.

Preventative Measures and Maintenance
While drift is often an inevitable consequence of prolonged use, some practices can help extend the life of your Joy-Cons:
- Keep Them Clean: Regularly wipe down your Joy-Cons to prevent dust and grime buildup, especially around the joysticks.
- Store Safely: When not in use, keep your Switch and Joy-Cons in a case to protect them from environmental dust and accidental impacts.
- Gentle Use: Avoid excessive force or aggressive movements when playing, as this can accelerate wear on the internal components.
- Use a Controller Case/Cover: Some silicone covers can offer a bit of extra protection against dust ingress around the joystick base.

Conclusion
Dealing with Joy-Con drift can be annoying, but as this guide demonstrates, it’s often a fixable issue for those willing to get their hands dirty. Whether it’s a simple cleaning or a full module replacement, tackling the problem yourself can be a rewarding and cost-effective solution, getting you back to uninterrupted gaming in no time. Always proceed with caution, use the right tools, and consult video guides if you need visual assistance during the repair process.


