What’s the best way to expand Nintendo Switch storage for digital games?

The Nintendo Switch, a marvel of portable gaming, boasts an incredible library of titles. However, its internal storage of 32GB (or 64GB for the OLED model) quickly becomes a bottleneck for players who prefer downloading digital games. With many modern titles easily exceeding 10GB, and some even pushing past 20GB, running out of space is a common frustration. Fortunately, expanding your Switch’s storage is straightforward and essential for any serious digital game collector.
The Undisputed King: MicroSD Cards
For Nintendo Switch users, there’s one overwhelmingly superior method for expanding storage: a microSD card. The Switch supports microSD, microSDHC, and microSDXC cards, offering a vast range of capacities from a few gigabytes to a whopping 2 terabytes (though 1TB is currently the practical maximum widely available and affordable).
Unlike some other consoles that might require proprietary external drives or complicated setups, the Switch’s reliance on readily available microSD cards makes expansion both convenient and cost-effective. These tiny cards slot neatly into a dedicated port under the kickstand, seamlessly integrating with your console’s existing storage.
Why MicroSD is Your Best Bet
- Simplicity: Easy to install and use. Simply insert the card, and the Switch will prompt you to format it if needed.
- Portability: The storage is integrated directly into the console, meaning your expanded library goes wherever your Switch goes.
- Cost-Effectiveness: MicroSD cards offer excellent value for money per gigabyte, especially when compared to proprietary storage solutions.
- Performance: Modern microSD cards, particularly those with good speed ratings, can often load games just as fast, if not faster, than the internal memory.
Choosing the Right MicroSD Card for Your Switch
Not all microSD cards are created equal. To ensure the best experience, there are a few key factors to consider when making your purchase:
Capacity: How Much Do You Really Need?
This is perhaps the most critical decision. While you can technically use any size, consider your gaming habits:
- 64GB – 128GB: Suitable for casual players with a handful of digital titles or those who primarily buy physical game cartridges.
- 256GB – 512GB: The sweet spot for most dedicated digital gamers. This offers ample space for numerous AAA titles and indie gems without constant juggling.
- 1TB or more: For serious digital collectors who want virtually their entire library on hand. Keep in mind that while 1TB cards are available, they come at a premium price.
Remember that system software and save data also occupy space, so always aim for a bit more than you think you’ll need.
Speed: Don’t Compromise on Load Times
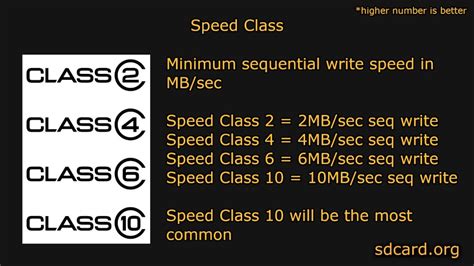
The Nintendo Switch supports UHS-I (Ultra High Speed Phase I) compatible microSD cards with a maximum transfer speed of 100MB/s. When looking at cards, pay attention to these ratings:
- UHS Speed Class (U1 or U3): U1 ensures a minimum write speed of 10MB/s, while U3 guarantees 30MB/s. For games, U3 is generally preferred for smoother performance, though U1 is often sufficient.
- Application Performance Class (A1 or A2): These ratings indicate how well a card handles random read/write operations, which are crucial for game loading. A1 cards are generally recommended, while A2 offers even better performance, though the Switch might not fully utilize A2’s peak capabilities. Look for cards labeled “UHS-I” and ideally “U3” and/or “A1.”
While U3 and A1 cards provide a noticeable improvement in loading times and overall responsiveness, practically any branded microSD card from a reputable manufacturer (like SanDisk, Samsung, or Lexar) with a decent speed rating will perform well.
Installing and Managing Your MicroSD Card
The process is incredibly simple:
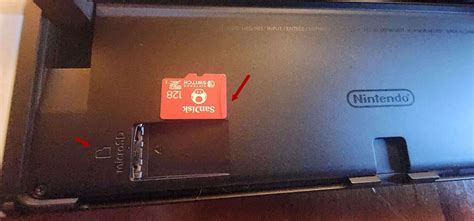
- Power Off: Completely power down your Nintendo Switch (hold the power button, then select Power Options > Turn Off).
- Locate Slot: Lift the kickstand on the back of the console to reveal the microSD card slot.
- Insert Card: Insert the microSD card with the label facing the same direction as the screen until it clicks into place.
- Power On: Turn on your Switch. If it’s a new card, the system will likely prompt you to format it. Follow the on-screen instructions.
Once installed, all new digital game downloads will automatically save to the microSD card. You can also move existing data from the internal memory to the card via the system settings (System Settings > Data Management > Move Data Between System / microSD Card).

Other Storage Considerations
- Cloud Saves: A Nintendo Switch Online subscription backs up most of your save data to the cloud, so even if your console is lost or damaged, your progress is safe. This doesn’t expand game storage, but it protects your invaluable save files.
- Physical vs. Digital: Physical game cartridges use minimal internal storage (only save data and patches), leaving more room for digital downloads. A mix of both can be an effective strategy.
Conclusion: MicroSD Cards Are the Definitive Solution
For anyone looking to expand their Nintendo Switch storage for digital games, a high-quality microSD card is not just the best way, it’s virtually the only practical and recommended way. By choosing a reputable brand with sufficient capacity (256GB or 512GB being ideal for most) and a decent speed rating (UHS-I, U3, A1), you can ensure a seamless and expansive gaming experience, free from the constant headache of managing limited space.