


What’s the best microSD card for my Switch to manage a large digital game library?

Expanding Your Switch’s Digital Horizon
The Nintendo Switch is a marvel of portable gaming, but its internal storage—a mere 32GB on the original model and Switch Lite, or 64GB on the OLED model—can quickly become a bottleneck for avid gamers. With the ever-growing library of incredible digital titles, from sprawling RPGs to indie gems, managing your game collection requires a robust storage solution. This is where a high-quality microSD card becomes an indispensable accessory for any Switch owner looking to maintain a large digital game library.
Why Your MicroSD Card Matters for Gaming Performance
It’s not just about space; it’s also about speed. While the Switch doesn’t demand the extreme read/write speeds of a PC or PS5 SSD, a slow microSD card can significantly impact your gaming experience. Slower cards can lead to longer game loading times, delays when accessing in-game assets, and even stuttering in some more demanding titles. Choosing the right card ensures that your games launch quickly and run smoothly, making your digital library a joy to navigate.
For gamers with a substantial collection, reinstalling games due to insufficient space is a tedious and time-consuming process. A large-capacity microSD card eliminates this frustration, allowing you to keep dozens, if not hundreds, of titles ready to play at a moment’s notice.
Key Factors When Choosing a MicroSD Card for Your Switch
1. Capacity: How Much Space Do You Really Need?
When dealing with a “large digital game library,” going big is the safest bet. Many Switch games range from 1GB to over 15GB (e.g., The Legend of Zelda: Tears of the Kingdom is around 18GB, Pokémon Scarlet/Violet over 10GB). Consider the following:
- 256GB: A decent starting point for moderate digital users, but will fill up fast with many AAA titles.
- 512GB: An excellent sweet spot for most avid gamers, offering plenty of room for dozens of major games and numerous indies.
- 1TB or More: If you truly aim to have a massive, almost comprehensive digital library without ever deleting games, a 1TB or even 1.5TB card is your ultimate solution. These were once prohibitively expensive but are becoming more accessible.
Always err on the side of more capacity if your budget allows. It saves you from needing to upgrade again in the near future.
2. Speed: U3, A2, and Beyond
This is where technical specifications come into play, and they are crucial for optimal performance:
- UHS Speed Class (U1 vs. U3): Look for U3. U3 cards offer a minimum sequential write speed of 30 MB/s, compared to U1’s 10 MB/s. While read speeds are more critical for games, U3 often indicates better overall performance.
- Application Performance Class (A1 vs. A2): This rating is designed for running apps directly from the card, which is precisely what the Switch does.
- A1: Offers a minimum of 1,500 random read IOPS and 500 random write IOPS.
- A2: Significantly boosts this to 4,000 random read IOPS and 2,000 random write IOPS. For the best Switch experience, an A2-rated card is highly recommended, as it directly impacts game loading and responsiveness.
In summary, aim for a card that is at least U3 and ideally A2-rated for the best performance on your Switch.
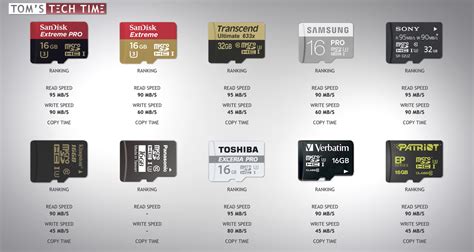
3. Brand Reliability and Authenticity
Stick to well-known, reputable brands to ensure quality and avoid counterfeit cards, which are unfortunately common. Fake cards often claim high capacities or speeds but deliver neither, leading to data corruption and frustration. Trusted brands include:
- SanDisk: Widely recognized for their “SanDisk Ultra” and “SanDisk Extreme” lines, both excellent choices for the Switch.
- Samsung: Their “EVO Select” and “PRO Plus” series offer robust performance.
- Lexar: Another reliable manufacturer with good options for gaming.
Always purchase from authorized retailers to guarantee you’re getting a genuine product.

Top Recommendations for Your Switch
While specific model names can vary, aim for cards like the SanDisk Extreme, Samsung EVO Select, or Lexar Play. Crucially, verify that they meet the U3 and A2 speed ratings and offer the capacity you need (512GB or 1TB+ is ideal for a large library).
These cards strike a perfect balance between speed, capacity, and price, providing a seamless experience for your digital game collection. Remember that newer, faster cards might emerge, so always check the latest U3 and A2 options from trusted brands.

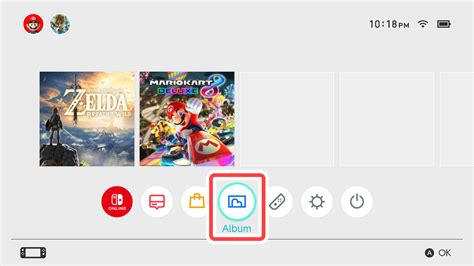
Installation and Management Tips
Once you have your chosen microSD card, installation is straightforward:
- Power Off: Completely power off your Nintendo Switch.
- Insert Card: Open the kickstand on the back of the console and slide the microSD card into the slot until it clicks.
- Power On: Turn your Switch back on. It should automatically detect and format the card.
- Transfer Data (Optional): If you’re upgrading from an older card, you’ll need to transfer your existing game data. This typically involves copying the contents of the old card to a PC, then to the new card.
- Default Download Location: The Switch will automatically prioritize the microSD card for new downloads if it’s inserted. You can also manually move individual games between the system memory and the microSD card via the Data Management settings.
Conclusion: Invest Wisely for Seamless Gaming
For Switch owners with an ever-expanding digital game library, a high-capacity, high-speed microSD card isn’t just an upgrade—it’s a necessity. By prioritizing cards with ample storage (512GB or 1TB+), fast U3 and A2 speed ratings, and purchasing from reputable brands, you can ensure a smooth, frustration-free gaming experience with all your favorite titles readily available. Make this smart investment and dive into your digital library without limits.


