


Running out of Switch storage? Best ways to free up space!

The Nintendo Switch, while a fantastic console, often leaves owners scrambling for storage space. With digital game downloads growing in size and constant software updates, it’s easy to hit the limit on your console’s internal 32GB (or 64GB for the OLED model) storage. Fortunately, there are several effective methods to free up space and keep your Switch ready for your next gaming adventure.
Understanding Your Switch’s Storage
Before diving into solutions, it’s helpful to understand how your Switch manages data. Games, updates, DLC, screenshots, and video captures all take up space. Save data, however, is typically very small and stored separately, meaning deleting a game won’t erase your progress.
1. Archive Software: The Quick and Easy Way
Archiving software is your best friend when you need to free up space quickly without completely removing a game from your library. When you archive a game, the main game data is deleted, but its icon remains on your Home screen, and crucially, your save data is preserved. You can re-download the game at any time.
- Go to System Settings > Data Management > Manage Software.
- Select the game you want to archive.
- Choose ‘Archive Software’.
This is ideal for games you might want to play again in the future but aren’t actively playing right now.
2. Delete Software: When You Need to Clear It Out
Deleting software completely removes the game data and its icon from your Home screen. Like archiving, your save data remains untouched on the console’s internal memory. This option is best for games you’ve finished, didn’t enjoy, or are confident you won’t play again.
- Go to System Settings > Data Management > Manage Software.
- Select the game you want to delete.
- Choose ‘Delete Software’.
You’ll need to re-download the game from the eShop if you change your mind later.
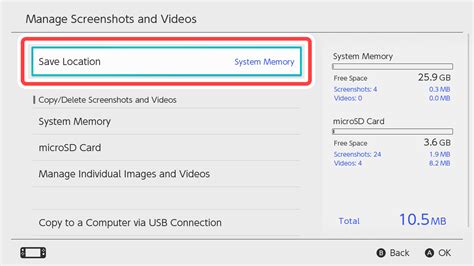
3. Manage Screenshots and Video Captures
While often overlooked, your collection of epic screenshots and hilarious video clips can take up a surprising amount of space, especially if you record a lot of 30-second videos. Regularly pruning these can free up significant chunks of data.
- From the Home menu, select the Album icon.
- Navigate through your captures.
- Select a capture and press ‘A’, then choose ‘Delete’. You can delete one by one or select multiple.
- Alternatively, you can transfer them to a microSD card or a smart device via a QR code connection.
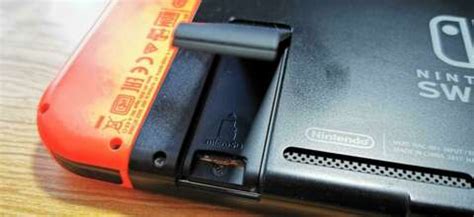
4. Invest in a MicroSD Card
This is arguably the most effective long-term solution for Switch storage woes. The Switch supports microSDXC cards up to a whopping 2TB (though 128GB, 256GB, or 512GB are more commonly used and affordable). Once inserted, games will automatically prioritize downloading to the microSD card.
- Purchase a high-speed microSDXC card (UHS-I compatible, with a read speed of 60-95 MB/s).
- Turn off your Switch and insert the microSD card into the slot under the kickstand.
- Power on your Switch; it will automatically recognize the card.
This expands your storage exponentially and is a must-have for any digital game collector.
5. Move Data to Your MicroSD Card
While the Switch doesn’t have a direct ‘move to SD card’ option for already installed software, there’s a workaround: you can archive the games currently on your internal memory and then re-download them. When re-downloading, if an SD card is present, the Switch will automatically install them there.
- Archive the games you wish to move from internal storage (as described in point 1).
- Ensure your microSD card is inserted.
- From the Home menu, select the archived game icon.
- Choose ‘Download’ to re-download the game data directly to your microSD card.
This method allows you to clear internal space and consolidate your games onto external storage.
6. Check for Corrupted Data
Occasionally, corrupted data can take up space without you realizing it. While rare, it’s worth checking if you’re experiencing unusual storage discrepancies.
- Go to System Settings > Data Management > Manage Software.
- If any corrupted data is found, it will often be indicated next to the software title. You can then delete it.
Regular Maintenance is Key
Making a habit of checking your storage every few months can save you frustration later. Archive games you’re not playing, delete old screenshots, and make sure your microSD card is doing its job. A little data management goes a long way in ensuring your Nintendo Switch is always ready for action.

Conclusion
Running out of storage on your Nintendo Switch is a common problem, but it’s easily solvable with these straightforward methods. Whether you’re archiving unused games, deleting old media, or making the smart move to a high-capacity microSD card, you can ensure your console always has room for your favorite titles and future releases.


