


Practical fixes for Nintendo Switch Joy-Con drift: DIY or professional?
The Persistent Problem of Joy-Con Drift
Nintendo Switch Joy-Con drift is a notorious issue that has plagued countless gamers since the console’s launch. Characterized by phantom inputs and characters moving on their own, even when you’re not touching the joystick, it can severely disrupt gameplay and enjoyment. This widespread hardware flaw often leaves players wondering about the best course of action: should they roll up their sleeves and attempt a fix themselves, or is it better to entrust their beloved console to a professional?
Understanding the Enemy: What Causes Joy-Con Drift?
Before diving into solutions, it’s helpful to understand the root cause. Joy-Con drift primarily stems from wear and tear on the internal components of the joystick module. Over time, dust, debris, and microscopic particles can accumulate beneath the joystick, interfering with the electrical contacts that register movement. Additionally, repeated mechanical stress from gameplay can degrade the conductive pads and springs, leading to inconsistent signals or a complete failure to register a neutral position.
DIY Solutions: Tackling Drift Yourself
For those with a bit of technical confidence, several DIY methods can address Joy-Con drift, ranging from simple software adjustments to more involved hardware replacements.
Software-Based Adjustments First
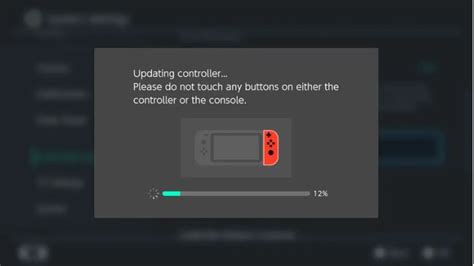
Before unscrewing anything, always start with software-based troubleshooting. Navigate to your Switch’s System Settings > Controllers and Sensors > Calibrate Control Sticks. Follow the on-screen instructions to check if calibration resolves the issue. If not, you might also try updating your Joy-Con firmware.
The Cleaning Approach
Often, dust and grime are the culprits. This method is less invasive than a full replacement:
- Compressed Air: Use a can of compressed air to blast under the rubber skirt around the base of the joystick. Move the stick around while doing so to dislodge any trapped particles.
- Contact Cleaner: For a deeper clean, specialized electronic contact cleaner (like isopropyl alcohol or WD-40 Specialist Contact Cleaner) can be gently applied under the joystick’s skirt. Use a very small amount on a cotton swab or directly spray a tiny burst, then move the stick around to work the cleaner in. Let it dry completely before use.
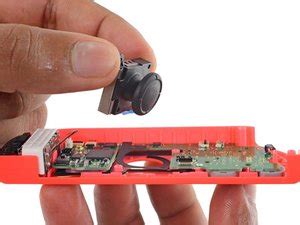
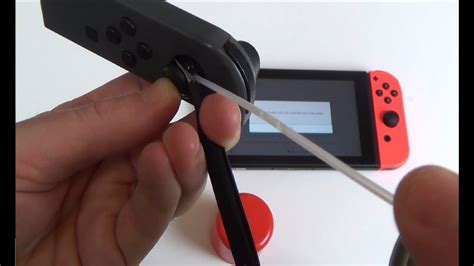
Replacing the Joystick Module (Advanced DIY)
If cleaning fails, the internal joystick module itself might be faulty. Replacing it is a more advanced DIY task but is highly effective. You’ll need specific tools, including a tri-wing screwdriver (for Nintendo screws), a small Phillips head screwdriver, tweezers, and replacement joystick modules (readily available online). There are numerous video tutorials that guide you step-by-step through opening the Joy-Con, disconnecting the battery and ribbon cables, and swapping out the faulty component. Be aware that this involves delicate work and carries a risk of damaging other internal parts if not done carefully.
Professional Interventions: When to Call in the Experts
Not everyone is comfortable opening their electronics, and sometimes the drift is beyond a simple DIY fix. In such cases, professional assistance is the way to go.
Nintendo’s Official Repair Service
Nintendo offers repair services for Joy-Con drift. In many regions, particularly where consumer protection laws are strong, Nintendo has offered free repairs even outside of warranty due to the widespread nature of the issue. Check Nintendo’s official support website for your region to see their current policy, submit a repair request, and get instructions for sending in your Joy-Cons. This option offers peace of mind with genuine parts and expert technicians, though turnaround times can vary.
Third-Party Repair Shops
Local electronics repair shops or specialized gaming console repair centers can also fix Joy-Con drift. These can be a quicker and sometimes more affordable alternative to Nintendo’s official service, especially if your warranty has expired or if you need the repair done quickly. Always research the shop’s reputation, ask about their experience with Joy-Cons, and inquire about their warranty for the repair.
Making the Right Choice: DIY vs. Professional
Deciding between DIY and professional repair depends on several factors:
- Your Skill Level: Are you comfortable with small electronics repair?
- Tools and Parts: Do you have or are you willing to acquire the necessary tools and replacement parts?
- Warranty Status: If your console is still under warranty, professional repair from Nintendo is often the safest bet.
- Cost: Compare the cost of DIY parts and tools versus professional repair fees.
- Time: How quickly do you need your Joy-Cons back in action?
- Risk Tolerance: DIY repairs carry a risk of further damage, while professional services offer guarantees.
Conclusion: Reclaiming Your Gaming Experience
Joy-Con drift is an undeniable nuisance, but it’s not a death sentence for your Nintendo Switch. Whether you choose to arm yourself with screwdrivers and contact cleaner or send your controllers off to the experts, there are practical and effective solutions available. By carefully considering your comfort level, resources, and the specifics of your situation, you can make an informed decision and get back to enjoying your favorite Switch games without those frustrating phantom movements.


