


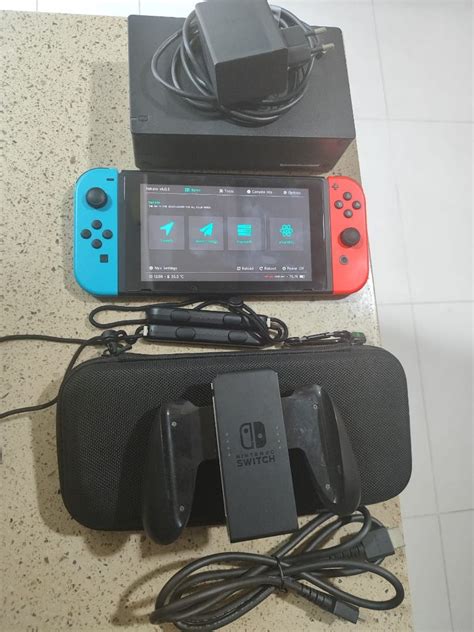
My Switch storage is full! What’s the best SD card & how to manage game data?

Ah, the dreaded “The system memory is full” message on your Nintendo Switch. It’s a common gamer’s plight, especially with the ever-growing size of digital downloads, game updates, and those impulse purchases from the eShop. Whether you’re a digital-only aficionado or enjoy the convenience of not swapping cartridges, running out of space can quickly halt your gaming adventures. But don’t despair! Expanding your Switch’s storage is straightforward, and managing your game data is easier than you might think.
The Essential Upgrade: Choosing the Right microSD Card
Unlike some other consoles, the Nintendo Switch relies on microSD cards for expandable storage. This means you can significantly boost your game library capacity with a simple, affordable accessory. But not just any microSD card will do.
MicroSD Card Types and Speed
The Switch is compatible with microSD (up to 2GB), microSDHC (2GB-32GB), and microSDXC (64GB and up) cards. For modern gaming, microSDXC is what you’ll want due to its larger capacities. More importantly, pay attention to the speed class. Nintendo recommends using a microSD card with a “UHS-I (Ultra High Speed Phase I) compatible” speed of 60 to 95 MB/s. While faster cards exist, the Switch itself caps the read speed, so going significantly beyond UHS-I U3 (which offers up to 95 MB/s) might not offer a noticeable performance boost but could cost more.
Capacity: How Much Do You Really Need?
This is where personal preference and gaming habits come into play. Here’s a rough guide:
- 64GB-128GB: Good for light gamers, or those who primarily buy physical cartridges and only download a few digital titles or updates.
- 256GB: A solid sweet spot for most gamers. It provides ample space for a good mix of digital downloads without breaking the bank.
- 400GB-512GB: Ideal for frequent digital purchasers or those with extensive libraries. You’ll rarely worry about space.
- 1TB+: For the ultimate digital collector. While pricier, these cards mean you practically never have to think about storage again for the Switch’s lifetime.
Top Recommendations for Nintendo Switch
Stick to reputable brands like SanDisk, Samsung, Lexar, and Kingston. SanDisk even makes officially licensed Nintendo Switch microSD cards, which are essentially standard, high-quality SanDisk cards with Nintendo branding and a slightly higher price tag. They perform identically to their non-branded counterparts of the same specifications. Look for cards rated A1 or A2 for app performance, as these typically indicate good random read/write speeds that benefit game loading.

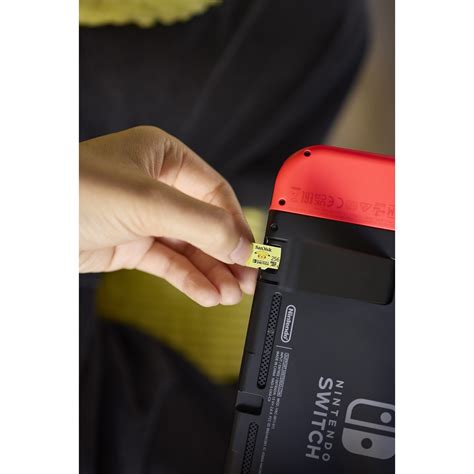
Installing and Setting Up Your New SD Card
Once you have your chosen microSD card, installation is a breeze:
- Power Down: Ensure your Nintendo Switch is completely powered off (not just in sleep mode).
- Locate Slot: Flip up the kickstand on the back of your Switch to reveal the microSD card slot.
- Insert Card: Insert the microSD card with the label facing away from the console until it clicks into place.
- Power On: Close the kickstand and power on your Switch. The system will automatically detect and format the card if needed.
New game downloads will now automatically save to your microSD card. Existing game data on your system memory will remain there until you move or archive it.
Mastering Game Data Management
Even with a huge SD card, good habits are key. Here’s how to manage your data effectively:
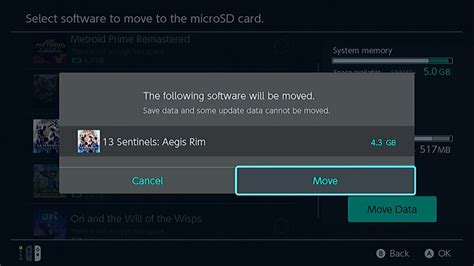
Moving Games Between System Memory and SD Card
Unfortunately, the Switch doesn’t have a direct “move” function for installed games. If you want to move a game from system memory to an SD card (or vice-versa), you have to archive it from its current location and then redownload it to the desired storage. This can be time-consuming for large titles.
Archiving vs. Deleting Software
- Archiving: This removes the game data from your console (freeing up space) but keeps the game icon on your Home menu. Your save data is not deleted; it remains on the system memory. You can redownload the game at any time from the eShop or your user page. This is the recommended option for games you might play again.
- Deleting: This removes the game data and its icon from your Home menu. While save data usually persists on the system, it’s a more drastic step if you’re sure you won’t play the game again soon or simply want a cleaner interface. You can still redownload deleted games.
To archive or delete: Go to System Settings > Data Management > Manage Software. Select the game, then choose “Archive Software” or “Delete Software.”
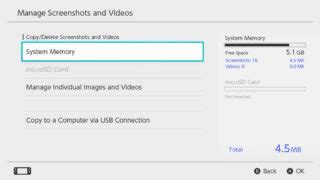
Managing Screenshots and Video Captures
Screenshots and video clips can surprisingly eat up space over time. They are stored on whichever memory (system or SD card) was active when they were taken. You can move them manually:
- Go to Album from the Home menu.
- Select an image/video, then press A for “Editing and Posting.”
- Choose “Copy” to move it between system memory and the microSD card.
- Alternatively, you can transfer them to a computer using a USB-C cable or upload them to a smart device/social media and then delete them from your Switch.
Ongoing Storage Habits
To keep your Switch tidy:
- Periodically Check Storage: Go to System Settings > Data Management to see what’s taking up space.
- Review Downloads: Archive games you’ve finished or haven’t touched in months.
- Clear Out Screenshots: Delete old screenshots and videos after backing them up.
- Digital vs. Physical: If you frequently run out of space, consider buying more physical games, as only updates and save data for physical titles take up significant internal storage.
With the right microSD card and a few smart data management practices, your Nintendo Switch storage woes will become a thing of the past, leaving you more time to enjoy your favorite games without interruption.


