


My Switch storage is full. What are the best ways to free up space for new games?
Navigating the Nintendo Switch Storage Crunch
Few things are as frustrating for a gamer as seeing that “Not enough free space” message pop up when you’re hyped to download a new title. The Nintendo Switch, with its modest internal storage (32GB for the original/Lite, 64GB for the OLED model), can fill up surprisingly fast, especially if you’re a fan of digital downloads. But don’t despair! There are several effective strategies to reclaim precious gigabytes and make room for your next adventure.
Archive Software: The Smart Way to Temporarily Free Space
For most users, archiving software is the easiest and most recommended first step. When you archive a game, the main software data is deleted from your system, but its icon remains on your HOME Menu and, crucially, your save data is preserved. This means you can redownload the game at any time and pick up exactly where you left off.
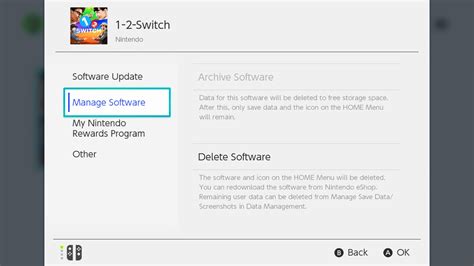
How to Archive:
- From the HOME Menu, highlight the game you wish to archive.
- Press the + or – button to open the Options menu.
- Select “Manage Software” then “Archive Software.”
- Confirm your choice.
This method is perfect for games you’ve finished or aren’t actively playing but might want to revisit later. Since save data is minimal, archiving frees up the bulk of the game’s footprint.
Delete Software: The More Permanent Solution
While similar to archiving, deleting software removes both the game data and its icon from your HOME Menu. Like archiving, it typically leaves your save data intact (unless you explicitly delete save data as well). You’ll need to redownload the game from the eShop if you ever want to play it again.
When to Delete:
- Games you’ve played and know you’ll never touch again.
- Digital versions of games you own physically (cartridges) but installed updates for.
- Demos you’re done with.
To delete software, follow the same steps as archiving, but choose “Delete Software” instead of “Archive Software.” Be certain before you delete, as the icon won’t be visible for easy redownload.
Expand with a microSD Card: The Ultimate Storage Upgrade
If you frequently download new games, a microSD card is not just a suggestion; it’s practically a necessity. The Switch supports microSD, microSDHC, and microSDXC cards up to 2TB. Once inserted, new game downloads will automatically prioritize the microSD card, significantly extending your storage capacity.
Choosing the Right microSD Card
- Speed: Look for cards with a high “UHS-I” speed class (U1 or U3) and a read speed of at 60-95 MB/s for optimal performance.
- Capacity: 128GB, 256GB, or even 512GB are popular choices, offering ample space for dozens of titles.
What about existing games? Games already installed on your Switch’s internal memory won’t automatically move to the microSD card. To move them, you’ll need to archive or delete them and then redownload them while the microSD card is inserted. They will then install to the card.

Managing Save Data: Handle with Care
It’s crucial to understand that game save data is stored separately from the game software and almost always resides on the Switch’s internal memory. This data is usually very small (megabytes at most) and doesn’t take up much space. More importantly, it cannot be moved to a microSD card.
Deleting save data is permanent and will wipe your progress for that specific game. Only do this if you are absolutely certain you want to start a game completely over or if you’re getting rid of a game permanently and don’t care about your progress. You can access save data management through System Settings > Data Management > Delete Save Data.

Clear Out Screenshots and Video Captures
Over time, your Switch’s Album can become a significant storage hog, especially if you frequently capture gameplay videos. These captures can quickly add up to gigabytes.
How to manage them:
- Go to the HOME Menu and select “Album.”
- You can view and delete individual screenshots and videos.
- For bulk management, you might consider transferring them to a computer via USB or moving them to a microSD card if you have one inserted. (Note: Only newly captured items will automatically save to the microSD card if one is present).

Checking Your Current Storage Usage
To get a clear picture of what’s consuming your Switch’s space, head to:
- System Settings
- Scroll down to “Data Management”
- Here you can see breakdowns for software, save data, and screenshots/videos, categorized by internal memory and microSD card (if present). This helps you identify the biggest culprits.
Conclusion: Stay Organized, Keep Gaming
Dealing with a full Switch isn’t the end of the world. By regularly archiving games you’re not playing, wisely using a microSD card, and occasionally tidying up your media captures, you can ensure your console always has room for new adventures. Proactive storage management will keep you gaming without interruption and help you make the most of your Nintendo Switch.


