


How to free up Switch storage for new big/small games?

Why Switch Storage Fills Up Fast
The Nintendo Switch, with its portability and vast game library, is a fantastic console. However, its internal storage (32GB for the original and Lite models, 64GB for the OLED model) can fill up surprisingly quickly. Modern games, whether big AAA titles or smaller indie gems, often demand significant space for their game data, updates, and DLC. When you hit that storage wall, downloading new games becomes impossible, prompting you to clear some room.
Check Your Current Storage Status
Before you start deleting things at random, it’s a good idea to see exactly what’s consuming your precious storage. The Switch provides a clear breakdown of how much space is being used by software, save data, and screenshots.
- From the HOME Menu, select System Settings.
- Scroll down the menu on the left and select Data Management.
- Here, you’ll see a summary of your internal storage and any inserted microSD card. Select Manage Software to see a list of all your games and their file sizes, sorted from largest to smallest.
Archive vs. Delete Software
When clearing space, you have two primary options for games: archiving or deleting. Understanding the difference is crucial.
Archiving Software
Archiving a game removes the main game data from your console, freeing up a significant amount of space. However, it keeps the game’s icon on your HOME Menu and, importantly, preserves your save data. This is ideal if you think you might want to play the game again in the future, as you can easily redownload it without losing your progress.
- From the HOME Menu, highlight the game you wish to archive.
- Press the + or – button to open the Options menu.
- Select Data Management, then choose Archive Software.
- Confirm your choice by selecting Archive.
Deleting Software
Deleting software removes both the game data and the game’s icon from your HOME Menu. While it also preserves your save data, it’s a more complete removal. This option is best for games you’re certain you won’t play again, or for digital games that you can easily redownload later if needed.
- From the HOME Menu, highlight the game you wish to delete.
- Press the + or – button to open the Options menu.
- Select Data Management, then choose Delete Software.
- Confirm your choice by selecting Delete.
Expand Storage with a microSD Card
The most effective and long-term solution for Switch storage woes is to invest in a high-capacity microSD card. The Nintendo Switch supports microSD, microSDHC, and microSDXC cards up to 2TB (though 2TB cards are not yet commercially available). Even a 128GB or 256GB card can dramatically increase your available space.
- Purchase a compatible microSD card. Look for cards with fast read/write speeds for optimal performance.
- Turn off your Nintendo Switch completely (not just sleep mode).
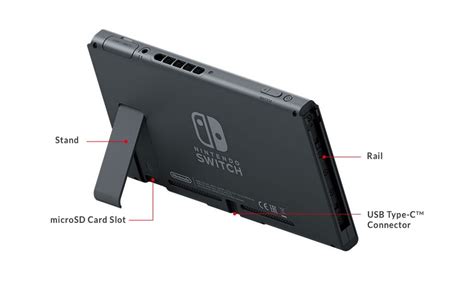
- Open the kickstand on the back of the console to reveal the microSD card slot.
- Insert the microSD card until it clicks into place.
- Turn on your Switch. The console will automatically detect the new storage.
Once inserted, all new game downloads will automatically be saved to the microSD card. You can also transfer existing downloadable software between the system memory and the microSD card via the Data Management settings, but this does not apply to physical game save data.

Managing Save Data
It’s important to note that game save data is stored separately from game software data. Even if you archive or delete a game, your save data for that game usually remains on your console’s internal memory. Save data files are typically very small, so they rarely take up significant space. However, if you are truly desperate for every last MB, you can manually delete save data.
- From the HOME Menu, select System Settings.
- Scroll down to Data Management and select Delete Save Data.
- Choose the game whose save data you wish to delete.
- Confirm your choice. Be warned: once deleted, save data cannot be recovered!
Nintendo Switch Online subscribers also have the benefit of Save Data Cloud Backup, which automatically backs up most game saves to the cloud, providing an extra layer of security against accidental deletion or console loss.

Clear Out Screenshots and Videos
While often small individually, a large collection of screenshots and video clips can add up. It’s a good idea to periodically review and delete unnecessary media, especially if you capture a lot of video clips.
- From the HOME Menu, select the Album icon.
- You can browse your captures and delete them individually or in batches.
- To move them off your Switch, you can copy them to a microSD card (if installed) or transfer them to a smart device wirelessly.
Redownloading Digital Games
Don’t worry about permanently losing your digital purchases. If you archive or delete a digital game, you can always redownload it from the Nintendo eShop, as long as your Nintendo Account is linked and you originally purchased the game.
- From the HOME Menu, select the Nintendo eShop icon.
- Select your user icon in the top-right corner.
- Scroll down to Redownload. Here you’ll find a list of all digital titles you’ve purchased and can redownload them as needed.

Conclusion
Managing your Nintendo Switch storage doesn’t have to be a headache. By regularly checking your storage, understanding the difference between archiving and deleting, and most importantly, investing in a microSD card, you can ensure there’s always room for the next big adventure. Keep your games organized and your console ready for action!


