


How to fix Nintendo Switch Joy-Con drift without replacing controllers?
Tired of Joy-Con Drift? Here’s How to Fight Back
Joy-Con drift is a frustratingly common issue for many Nintendo Switch owners. It’s when your character or cursor moves on its own without you touching the joystick, leading to missed shots, wrong turns, and general gaming mayhem. While replacing the controllers is always an option, it can be costly. The good news is that there are several methods you can try at home to fix Joy-Con drift without opening your wallet for new hardware.
Understanding the Root Causes of Drift
Before diving into fixes, it helps to understand why Joy-Con drift occurs. The primary culprits are usually wear and tear on the internal components, or debris (dust, lint, crumbs) getting trapped under the joystick mechanism. Over time, the conductive pads can degrade, or physical obstructions can prevent the joystick from returning to its true center position. Software glitches can also occasionally mimic drift symptoms.
Method 1: Software Calibration – The First and Easiest Step
Sometimes, the issue isn’t physical but rather a software misinterpretation of the joystick’s position. This is the simplest fix to attempt and often resolves minor drift issues.
- From the Switch Home Menu, select System Settings.
- Scroll down the left-hand menu and select Controllers and Sensors.
- Choose Calibrate Control Sticks.
- Press down on the control stick you wish to calibrate.
- If a circular target appears off-center, follow the on-screen instructions to calibrate it. You’ll be asked to move the stick in a full circle a few times.
- Once calibrated, test your controller in a game to see if the drift persists.

Method 2: Deep Cleaning the Joystick Mechanism
If calibration doesn’t work, dust and debris are likely the culprits. A thorough cleaning can often restore functionality.
What You’ll Need:
- Compressed air (with a thin nozzle)
- Electrical contact cleaner (e.g., WD-40 Specialist Contact Cleaner)
- A microfiber cloth or cotton swabs
Cleaning Steps:
- Power Off Your Switch: Always do this before any physical maintenance.
- Lift the Rubber Skirt: Gently lift the flexible rubber skirt around the base of the control stick. You can use your fingernail or a thin, non-abrasive tool like a plastic pry tool.
- Apply Compressed Air: While holding the skirt up, blast short bursts of compressed air into the opening. Rotate the stick and apply air from different angles to dislodge any trapped debris.
- Apply Contact Cleaner: With the skirt still lifted, spray a small amount of electrical contact cleaner into the same opening. Move the joystick around vigorously in all directions for about 30-60 seconds to help the cleaner work its way in and spread.
- Wipe Excess: Use your microfiber cloth to wipe away any excess cleaner from the Joy-Con surface.
- Let it Dry: Allow the Joy-Con to air dry completely for at least 15-30 minutes before reattaching it to your Switch or powering on.
- Test: Reconnect and test the Joy-Con in the calibration menu or a game. Repeat if necessary.
Method 3: The Cardboard/Paper Shim Fix (More Advanced)
This method addresses potential issues with the pressure applied to the joystick’s internal contact points. It’s a more involved DIY fix and requires a bit of dexterity.
What You’ll Need:
- A tiny piece of thin, sturdy material (e.g., a sliver of cardstock, a piece of a business card, or even heavy-duty aluminum foil folded several times).
- A small Phillips-head screwdriver (usually a #00 or #000)
- A plastic pry tool (optional, but helpful)
- Patience!
Steps:
- Power Off and Disconnect: Power down your Switch and remove the affected Joy-Con.
- Remove Back Screws: Carefully remove the four small Y-shaped screws on the back of the Joy-Con. (Note: This may void your warranty. Proceed with caution.)
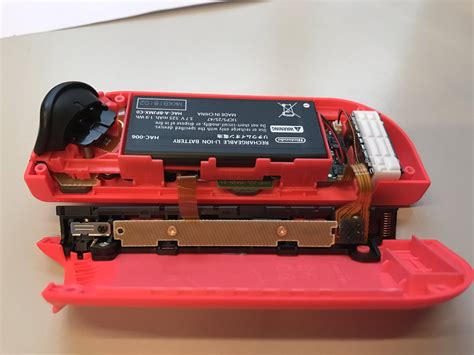
- Gently Open the Casing: Use a plastic pry tool to carefully separate the two halves of the Joy-Con shell. Be extremely gentle, as there are ribbon cables connecting the components inside. Do not pull them apart forcefully.
- Locate the Joystick Module: Once open, you’ll see the internal components. Identify the problematic joystick module.
- Insert the Shim: Carefully slide your small piece of shim material underneath the metallic bracket that holds the joystick module in place. The goal is to apply very slight upward pressure on the module, ensuring better contact with the circuit board.
- Reassemble Carefully: Carefully close the Joy-Con shell, ensuring no cables are pinched. Replace the Y-screws.
- Test: Power on your Switch and test the Joy-Con in the calibration menu and a game.
Other Quick Troubleshooting Tips
- Update System Software: Ensure your Nintendo Switch console and Joy-Cons are running the latest firmware. Go to System Settings > System > System Update.
- Disconnect and Reconnect: Sometimes simply detaching and reattaching the Joy-Cons to the Switch can resolve minor connection glitches.
- Test in Another Game: Occasionally, drift might be more noticeable in specific games due to their sensitivity settings. Test in a few different titles to confirm it’s a consistent hardware issue.

When to Consider Professional Help or Replacement
While these DIY methods are effective for many, some severe cases of Joy-Con drift may indicate irreversible wear or damage to the internal sensors. If you’ve tried all the above steps multiple times without success, the joystick module itself might be beyond DIY repair. At this point, you could consider:
- Contacting Nintendo Support for official repair options (if still under warranty).
- Replacing the faulty joystick module with a new one (a more advanced DIY repair that involves soldering or specific connectors, depending on the Joy-Con version).
- Purchasing new Joy-Cons as a last resort.
By following these steps, you stand a good chance of reviving your drifting Joy-Cons and getting back to uninterrupted gaming without the immediate need for costly replacements.


