


Fixing Joy-Con drift: practical steps for Nintendo Switch owners?
Joy-Con drift is a frustrating reality for many Nintendo Switch owners, manifesting as phantom movements or inputs even when the joystick is untouched. This can significantly impact gameplay, making precision challenging or even impossible. While Nintendo has acknowledged the issue and offered repairs, understanding the causes and knowing practical steps you can take can help resolve the problem or at least mitigate its effects. This guide walks you through various troubleshooting methods, from simple software adjustments to more involved hardware fixes.
Understanding Joy-Con Drift
At its core, Joy-Con drift is often caused by wear and tear on the joystick’s internal components, specifically the potentiometers that track movement. Over time, dust, debris, or degradation of the conductive material can lead to inaccurate signal readings, causing the system to register movement where there is none. Before diving into solutions, it’s helpful to understand that this isn’t necessarily a user error but a design susceptibility to regular use.
Initial Software Troubleshooting Steps
Before considering any hardware solutions, it’s always best to start with software-based troubleshooting. These steps are simple, risk-free, and often effective for minor cases of drift.
1. Calibrate Your Control Sticks
The first port of call should be recalibrating your Joy-Cons. This process resets the control stick’s default position and can often resolve minor drift issues.
- From the HOME Menu, select System Settings.
- Scroll down the menu on the left and select ‘Controllers and Sensors’.
- Select ‘Calibrate Control Sticks’.
- Follow the on-screen prompts to tilt and rotate the problematic stick, then press the X button to recalibrate.
2. Update Joy-Con Firmware
Outdated Joy-Con firmware can sometimes lead to performance inconsistencies. Ensuring your controllers are running the latest software can help.
- From the HOME Menu, select System Settings.
- Scroll down to ‘Controllers and Sensors’.
- Select ‘Update Controllers’.
- Allow the system to check for and apply any available updates.
![[Switch] How do I calibrate the control sticks? | Q&A | Support | Nintendo](/images/aHR0cHM6Ly90czEubW0uYmluZy5uZXQvdGg/aWQ9T0lQLmZHRzIydExfX2Z5MUU0YzJ1V3RINmdIYUVLJnBpZD0xNS4x.webp)
3. Check for System Updates
Similarly, ensure your Nintendo Switch console’s system software is up to date, as updates often include bug fixes and performance improvements that could indirectly affect controller functionality.
Hardware-Based Solutions and DIY Fixes
If software troubleshooting doesn’t work, the problem likely lies within the physical components of the Joy-Con. Here are some methods to try, ranging from simple cleaning to more advanced repairs.
1. Cleaning Under the Stick
Often, dust or debris can accumulate under the rubber skirt of the joystick, interfering with its sensors. A simple cleaning can sometimes dislodge this obstruction.
- Gently lift the rubber skirt at the base of the joystick.
- Use a can of compressed air to blow under the skirt in short bursts, trying to dislodge any debris.
- Alternatively, a small amount of electrical contact cleaner (like isopropyl alcohol applied with a cotton swab) can be used, ensuring the Joy-Con is powered off and allowed to dry completely before use.
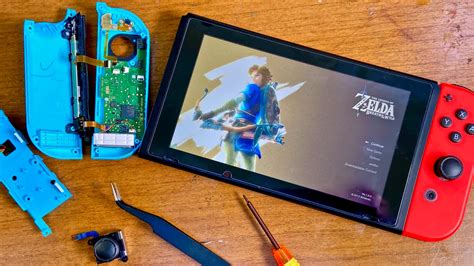
2. Replacing the Joystick Module
For persistent drift, the most effective DIY solution is often to replace the entire joystick module. This requires opening the Joy-Con, which can void your warranty if not done by an authorized service center. Replacement kits are widely available online and typically include a new joystick module, screwdrivers, and prying tools. This is a more advanced fix, requiring careful attention to detail.
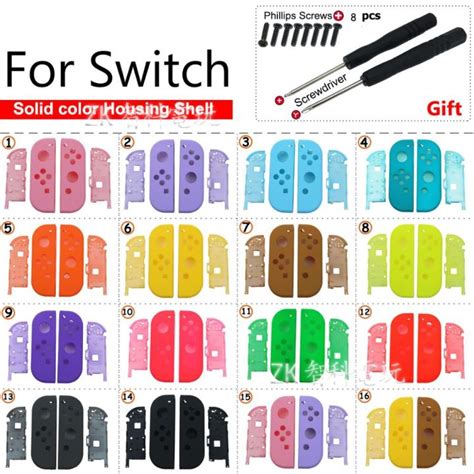
- Purchase a Joy-Con joystick replacement kit.
- Follow a reputable video tutorial for your specific Joy-Con model carefully, paying attention to battery disconnection and ribbon cable handling.
- Replace the old joystick module with the new one.
- Reassemble the Joy-Con and test for drift and functionality.
When to Seek Professional Help or Replacement
If DIY fixes are not within your comfort zone or fail to resolve the issue, you still have options.
1. Nintendo’s Official Repair Program
Nintendo has offered free Joy-Con drift repairs in many regions, even outside of warranty, due to the widespread nature of the issue. Check Nintendo’s official support website for your region’s specific policy and instructions on how to send in your Joy-Cons for repair.
2. Consider New Joy-Cons or a Pro Controller
If all else fails, or if you prefer not to deal with repairs, purchasing new Joy-Cons or investing in a Nintendo Switch Pro Controller can be a solution. The Pro Controller is known for its robust build quality and significantly reduced likelihood of experiencing drift, offering a more durable and comfortable gaming experience for many titles.
Conclusion
Joy-Con drift is a frustrating issue, but it’s often fixable. By starting with simple software calibrations and updates, and progressing to cleaning or even module replacement if necessary, you can often restore your controllers to full functionality. Remember to always exercise caution with hardware repairs and consider Nintendo’s official repair services as a reliable alternative. With these steps, you can get back to enjoying your Nintendo Switch games without the annoyance of unwanted inputs.


