


Fix Joy-Con drift without buying new ones?
Tired of Unwanted Movement? Understanding Joy-Con Drift
Joy-Con drift is a notorious issue for many Nintendo Switch owners. It’s that frustrating phenomenon where your in-game character or cursor moves without you even touching the analog stick, leading to missed shots, wrong turns, and general gameplay chaos. While buying a new pair of Joy-Cons is always an option, it’s an expensive one. The good news is that there are several approaches you can take to try and remedy the drift without reaching for your wallet to buy replacements.
Typically, drift occurs due to wear and tear on the internal components of the analog stick module, which can include dust, debris, or degraded contact points within the joystick potentiometer. Before you embark on a repair journey, it’s helpful to understand the various levels of intervention available, from simple software tweaks to more involved physical repairs.
First Steps: Software Fixes and Calibration
Sometimes, the issue isn’t hardware-related but a calibration problem. It’s always best to start with the easiest, least invasive solutions first.
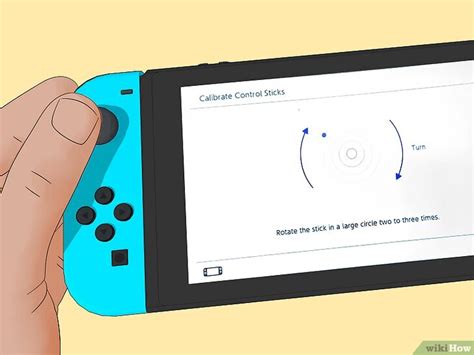
1. Calibrate Your Sticks
Nintendo provides a built-in calibration tool that can often resolve minor drift. To access it:
- From the HOME Menu, select System Settings > Controllers and Sensors > Calibrate Control Sticks.
- Follow the on-screen prompts, tilting the stick in a full circle and observing the crosshairs. If they don’t center properly, you’ll be prompted to recalibrate.
- Repeat this for both Joy-Cons.
2. Update Joy-Con Firmware
Ensure your Joy-Cons are running the latest firmware. Updates can sometimes include bug fixes or improved calibration parameters.
- From the HOME Menu, select System Settings > Controllers and Sensors > Update Controllers.
- Make sure both Joy-Cons are attached or paired wirelessly and the update process completes.
Non-Invasive Physical Cleaning Methods
If software fixes don’t work, dust or debris might be interfering with the stick’s sensors. These methods aim to clean the stick without opening the Joy-Con.
3. Compressed Air
Using a can of compressed air, aim short bursts around the base of the analog stick. Gently lift the rubber skirt around the stick to create a small gap and direct the air underneath it. This can dislodge dust or small particles that are causing interference.
4. Electronic Contact Cleaner
This is a slightly more aggressive but often effective method. Purchase an electronic contact cleaner (look for brands like WD-40 Specialist Contact Cleaner, ensuring it’s plastic-safe and non-residue). With the Joy-Con powered off:
- Gently lift the rubber skirt at the base of the analog stick.
- Spray a tiny amount of contact cleaner directly into the gap.
- Wiggle the stick around for about 30-60 seconds to help distribute the cleaner.
- Allow it to dry completely (usually a few minutes) before testing.
This method can clean the internal contacts of the potentiometer, often resolving minor to moderate drift. Repeat if necessary, but avoid over-saturating the device.

More Involved: DIY Physical Repair (Use with Caution)
If cleaning and calibration fail, the problem is likely internal wear. This next step involves opening the Joy-Con and requires some technical skill. Be aware that opening your Joy-Cons can void your warranty.
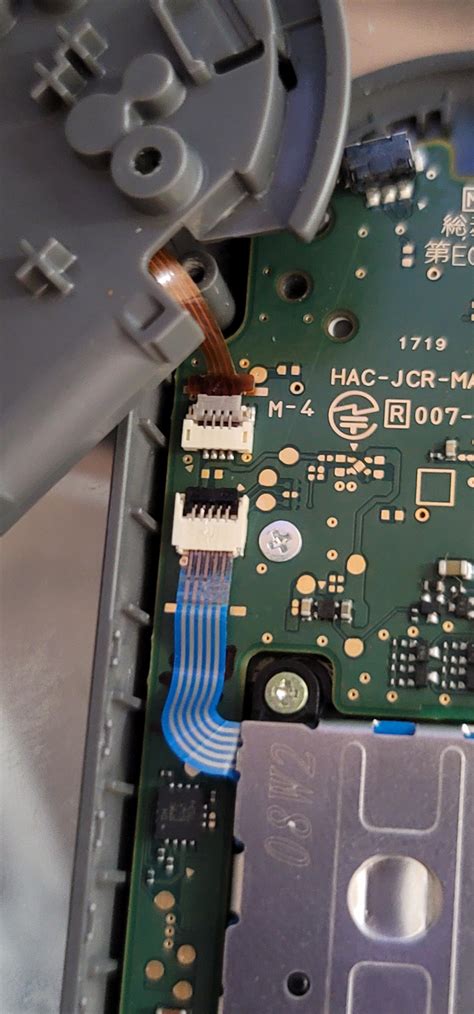
5. Replace the Analog Stick Module
This is often the most definitive DIY fix. You can purchase replacement analog stick modules online for a relatively low cost. The process typically involves:
- Using a precision screwdriver set (often tri-wing and Phillips head) to open the Joy-Con casing.
- Carefully disconnecting ribbon cables and removing the battery.
- Unscrewing and removing the old analog stick module.
- Installing the new module and reassembling the Joy-Con.
Numerous video tutorials are available online that walk you through this process step-by-step. Take your time, keep track of all screws, and be gentle with the delicate internal components.
Preventative Measures to Extend Joy-Con Life
Once you’ve fixed your drift, or if you’re trying to prevent it in the first place, consider these tips:
- Play Gently: Avoid excessive force or ‘mashing’ the analog sticks.
- Keep Clean: Store your Switch and Joy-Cons in a clean, dust-free environment.
- Avoid Liquids: Spills can introduce conductive debris or corrosion.
- Consider Protective Covers: Some silicone covers can help prevent dust from entering the stick mechanism.

Conclusion: A Second Life for Your Joy-Cons
Joy-Con drift is a widespread problem, but it doesn’t always have to mean buying brand new controllers. From simple software adjustments and targeted cleaning with compressed air or contact cleaner, to the more involved process of replacing the analog stick module, there are viable solutions for various levels of technical comfort. By taking a methodical approach, you can often bring your drifting Joy-Cons back to full functionality, saving money and reducing electronic waste. Always proceed with caution, especially when dealing with internal components, and ensure you have the right tools for the job.


