Fix Joy-Con drift on Nintendo Switch without buying new ones?

Understanding Joy-Con Drift: A Persistent Problem
Nintendo Switch Joy-Cons are renowned for their versatility, but also for a persistent and frustrating issue: Joy-Con drift. This phenomenon causes your in-game character or cursor to move without any input from you, making precision gaming impossible. While many gamers resign themselves to buying new Joy-Cons, there are several effective methods to tackle drift without opening your wallet for replacements. This guide will walk you through potential software fixes, cleaning techniques, and even a more involved hardware repair.

First Steps: Software Solutions and Calibration
Before you start disassembling anything, it’s crucial to exhaust all software-based remedies. Sometimes, drift can be a calibration issue rather than a physical malfunction.
1. Calibrate Your Control Sticks:
- From the HOME Menu, select System Settings.
- Scroll down and select ‘Controllers and Sensors.’
- Select ‘Calibrate Control Sticks’ and follow the on-screen prompts. You’ll need to tilt the problematic stick in a full circle and confirm its responsiveness.
2. Update Your Joy-Con Firmware:
- Still in ‘Controllers and Sensors,’ select ‘Update Controllers.’ Ensure your console is connected to the internet.
- Outdated firmware can sometimes cause quirky behavior.
If calibration and firmware updates don’t resolve the issue, it’s highly likely that dust, debris, or wear-and-tear inside the stick mechanism is the culprit.
Getting Hands-On: Cleaning Your Joy-Cons
Often, dust, lint, or other debris can get underneath the rubber skirt of the analog stick, interfering with its sensors. Cleaning can be surprisingly effective.
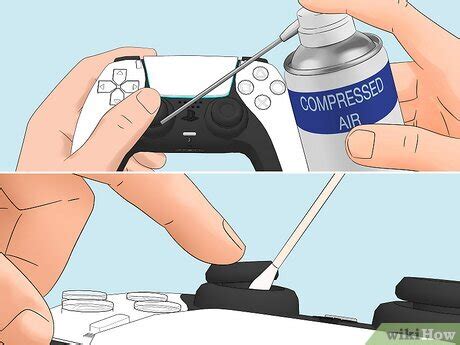
1. The Compressed Air Method:
- Turn off your Switch and remove the Joy-Con.
- Gently lift the rubber skirt around the base of the problematic analog stick.
- Using short bursts of compressed air (from a can, available at electronics stores), spray underneath the skirt from various angles. Be careful not to hold the can too close or upside down, as this can release liquid propellant.
- Wiggle the stick around to dislodge any remaining particles.
2. Electrical Contact Cleaner:
If compressed air isn’t enough, electrical contact cleaner (like WD-40 Specialist Electrical Contact Cleaner) can penetrate further. This should be done with caution.
- Remove the Joy-Con and ensure the Switch is off.
- Lift the rubber skirt of the analog stick.
- Spray a very small amount of contact cleaner directly underneath the skirt, into the mechanism. Avoid over-spraying.
- Immediately wiggle the stick vigorously for 30-60 seconds to work the cleaner in and loosen debris.
- Allow the Joy-Con to dry completely for at least 10-15 minutes before reattaching it to the Switch and testing.

The More Involved Fix: Replacing the Analog Stick
If cleaning doesn’t work, the internal potentiometer (the sensor that detects stick movement) might be worn out or damaged. Replacing the entire analog stick module is a more advanced but highly effective solution, and replacement parts are readily available online.
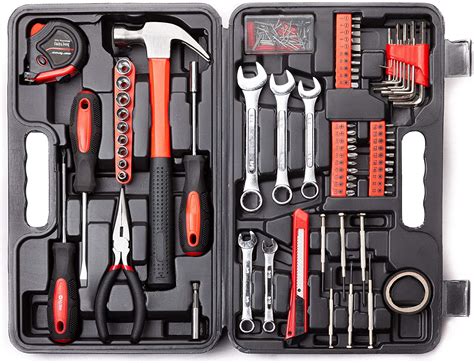
Tools You’ll Likely Need:
- Tri-wing Y00 screwdriver
- Phillips head screwdriver (PH00 or similar)
- Plastic spudger or opening tool
- Tweezers
- Replacement analog stick module (make sure it’s compatible with your specific Joy-Con model)
General Steps (Always refer to a detailed video guide for your specific Joy-Con model):
- Carefully unscrew the four tri-wing screws on the back of the Joy-Con.
- Gently pry open the casing using a plastic spudger. Be mindful of ribbon cables connecting the two halves.
- Locate the battery and carefully disconnect its ribbon cable, then remove the battery.
- Unscrew any internal Phillips head screws securing the mid-frame or housing.
- Carefully disconnect the ribbon cable for the analog stick module you wish to replace.
- Unscrew the two Phillips head screws holding the analog stick in place and remove it.
- Insert the new analog stick module, screw it in, and reconnect its ribbon cable.
- Reassemble the Joy-Con in reverse order, being extremely careful with all ribbon cables.
This process requires patience and a steady hand, but it can completely eliminate drift and extend the life of your Joy-Cons significantly.

Preventative Measures and Final Thoughts
Once you’ve fixed the drift, consider these tips to prolong the life of your Joy-Cons:
- Avoid Dust and Debris: Store your Switch and Joy-Cons in a clean environment, perhaps in a case, when not in use.
- Gentle Use: While gaming can be intense, avoid unnecessarily harsh or forceful movements on the analog sticks.
- Regular Cleaning: A quick blast of compressed air every few months can prevent build-up.
Joy-Con drift is a common annoyance, but it doesn’t have to mean purchasing new controllers every time it occurs. With a bit of patience and the right tools, you can often fix the problem yourself, saving money and keeping your existing gear out of the landfill. Empower yourself to tackle this common gaming woe!