


DIY fixes for Nintendo Switch Joy-Con drift issues at home?

Nintendo Switch Joy-Con drift is a notoriously common and frustrating issue where your controller registers movement even when the stick isn’t being touched, leading to unintended inputs in games. Before you shell out for new Joy-Cons or a professional repair, there are several DIY methods you can try at home. Here’s a guide to tackling this pervasive problem.
Understanding Joy-Con Drift
Joy-Con drift typically stems from a combination of dust, debris, and wear and tear on the internal components of the joystick module. Over time, the conductive pads and sensors under the joystick can become dirty or worn, leading to inconsistent electrical signals that the Switch interprets as movement.
Before You Start: Basic Checks
Always begin with the simplest solutions. Sometimes, drift isn’t a hardware issue:
- Update Software: Ensure your Nintendo Switch console and Joy-Cons have the latest system software updates. Go to System Settings > System > System Update.
- Calibrate Control Sticks: In System Settings > Controllers and Sensors > Calibrate Control Sticks, follow the on-screen instructions to check and recalibrate your problematic Joy-Con. If the dot doesn’t center, try calibrating it.
- Check for Interference: Make sure there are no other wireless devices interfering with your Joy-Cons.
Method 1: The Contact Cleaner Solution
This is often the first line of defense and can work wonders if dirt and debris are the culprits. You’ll need electronic contact cleaner (like WD-40 Specialist Contact Cleaner, not regular WD-40).
- Power off your Switch and detach the Joy-Cons.
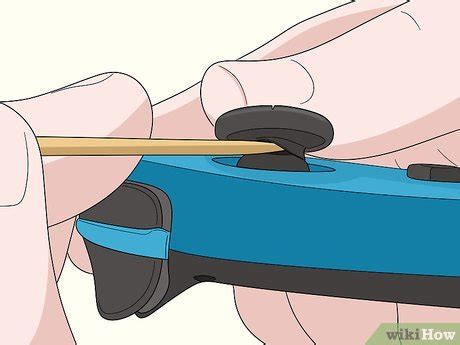
- Gently lift the small rubber skirt around the base of the drifting joystick. You might need a thin plastic prying tool or a toothpick for this.
- Spray a small amount of electronic contact cleaner into the gap, around the base of the stick. Be careful not to over-saturate.
- Rotate and click the joystick in all directions for about 30-60 seconds to help distribute the cleaner and dislodge any debris.
- Let the Joy-Con sit for 10-15 minutes to allow the cleaner to dry completely before reattaching to the Switch.
- Test the Joy-Con. You may need to repeat this process a few times.
Method 2: The Cardboard Shim Trick
This method addresses potential wear in the internal contact points of the joystick module. It involves adding a tiny shim to create better contact.
- You’ll need a small Phillips head screwdriver (PH00 or PH000), a plastic prying tool, and a very thin piece of cardboard or paper (e.g., from a playing card or a thick business card).
- Carefully unscrew the four small screws on the back of the Joy-Con.
- Gently pry open the Joy-Con casing. Be extremely careful of the ribbon cables connecting the two halves.
- Locate the joystick module. You’ll see a small metal plate on top of the module.
- Using tweezers, carefully lift the small metal plate (it might be held by tiny clips) and then lift the black plastic housing underneath it.
- Cut a tiny, thin piece of cardboard/paper, roughly 5x5mm, and place it directly on top of the contact points, underneath where the black plastic housing sits.
- Reassemble the Joy-Con, making sure all ribbon cables are seated correctly before closing the case and tightening the screws.
- Test your Joy-Con for drift.

Method 3: Joystick Module Replacement (Advanced DIY)
If cleaning and shims don’t work, the internal components of the joystick module might be too worn. Fortunately, replacement modules are inexpensive and widely available, and replacing one is a more advanced DIY fix.
- You’ll need a replacement joystick module (ensure it’s compatible with your Joy-Con model), a small Phillips head screwdriver, a tri-wing screwdriver (for some internal screws), and plastic prying tools.
- Follow the initial steps to open the Joy-Con casing as in Method 2.
- Carefully disconnect any ribbon cables that impede access to the joystick module. Take pictures if needed to remember how they connect.
- Unscrew the tiny screws holding the joystick module in place (there are typically 2-3).
- Gently remove the old joystick module and replace it with the new one.
- Reconnect all ribbon cables and reassemble the Joy-Con.
- Test the Joy-Con and perform calibration if necessary.

Important Considerations & Warnings
- Voiding Warranty: Opening your Joy-Cons will likely void any remaining warranty with Nintendo. Proceed at your own risk.
- Delicate Components: Joy-Cons contain very small and delicate components. Be extremely gentle, especially with ribbon cables and connectors.
- Proper Tools: Using the correct screwdriver sizes (PH00/PH000, Y00/Y000 tri-wing) is crucial to avoid stripping screws.
- Static Electricity: Work in a clean, static-free environment if possible.
When to Consider Professional Repair or New Joy-Cons
If all DIY attempts fail, or if you’re not comfortable opening your Joy-Cons, it might be time to consider other options:
- Nintendo’s Repair Program: In many regions, Nintendo offers free Joy-Con drift repair, even out of warranty, due to the widespread nature of the issue. Check their official support website for your region’s policy.
- Third-Party Repair Shops: Local electronics repair shops might offer professional services.
- New Joy-Cons or Controllers: As a last resort, purchasing a new pair of Joy-Cons or an alternative controller (like a Pro Controller) might be the most straightforward solution, especially if you prefer not to tinker with electronics.

Joy-Con drift can be a nuisance, but with a bit of patience and the right tools, these DIY fixes offer a good chance of getting your Nintendo Switch controllers back in working order without spending a fortune.


