Best MicroSD for Switch game storage: How to pick, install & manage?

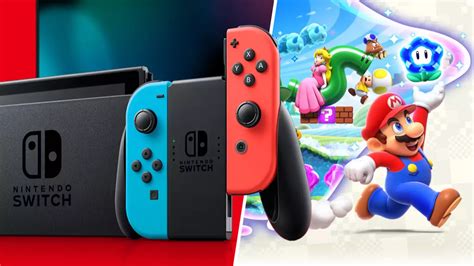
Why a MicroSD Card is Essential for Your Nintendo Switch
The Nintendo Switch, with its vast library of digital games and ever-growing updates, quickly fills its modest 32GB or 64GB of internal storage. For serious gamers, a high-capacity microSD card isn’t just a luxury; it’s a necessity. It expands your console’s storage, allowing you to download more games, updates, and DLC without constantly deleting and re-downloading.
But with so many options available, how do you choose the right one, get it set up, and keep your game library organized? This guide will walk you through everything you need to know.

Choosing the Best MicroSD Card for Your Switch
Not all microSD cards are created equal, and picking the right one involves balancing capacity, speed, and budget.
Capacity: How Much Space Do You Really Need?
- 128GB: A good starting point for casual gamers or those who buy mostly physical games. Provides ample space for several large digital titles and many smaller ones.
- 256GB: The sweet spot for many Switch owners. Offers significant room for a diverse digital library without breaking the bank.
- 512GB: Ideal for avid digital collectors. You’ll rarely worry about space for a long time.
- 1TB+: For the ultimate digital hoarder. While more expensive, it provides unparalleled freedom.
Consider the average size of Switch games (e.g., The Legend of Zelda: Breath of the Wild is ~14GB, Super Smash Bros. Ultimate is ~16GB) and your downloading habits.
Speed Matters: UHS-I, A1/A2, and V30 Explained
The Nintendo Switch supports UHS-I (Ultra High Speed Phase I) cards, with a maximum data transfer rate of up to 100MB/s. While faster cards exist (UHS-II), the Switch cannot utilize their full speed, making them an unnecessary expense.
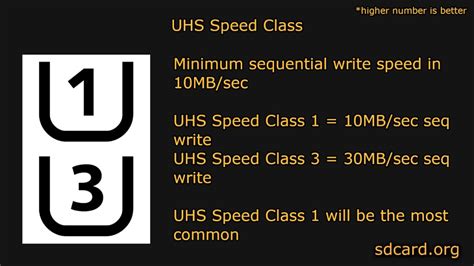
- UHS Speed Class: Look for cards marked U1 or U3. U1 offers a minimum write speed of 10MB/s, while U3 guarantees 30MB/s. The Switch benefits most from faster read speeds, but a decent write speed is also helpful for game installs and updates.
- Application Performance Class (A1/A2): These ratings indicate a card’s ability to handle random read/write operations, which is crucial for running applications. While the Switch doesn’t specifically require A1 or A2, cards with these ratings often perform better overall.
- Video Speed Class (V10, V30, etc.): V30 cards guarantee a minimum sequential write speed of 30MB/s, beneficial for large file transfers.
Recommendation: A UHS-I card with a U1 or U3 rating, and ideally A1 or V30, offers the best balance of performance and cost for the Switch. Brands like SanDisk, Samsung, and Lexar are reliable choices.
How to Install Your MicroSD Card
Installing a microSD card into your Nintendo Switch is a straightforward process.
Step-by-Step Installation:
- Power Down: Completely turn off your Nintendo Switch. Do not just put it to sleep. Hold down the power button until the power options appear, then select ‘Power Off’.
- Locate the Slot: On the back of the Switch console, lift up the kickstand. You’ll see a small slot for the microSD card.
- Insert the Card: Gently slide the microSD card into the slot with the label facing the same direction as the Switch’s screen (or towards the top of the console when it’s upright). Push it in until you hear a small click, indicating it’s securely in place.
- Power On: Close the kickstand and power on your Switch.
- Format (if prompted): If it’s a brand new card, your Switch may prompt you to format it. Follow the on-screen instructions. Formatting will erase any existing data on the card, so ensure it’s empty if you’ve used it before.
Once installed, your Switch will automatically use the microSD card for new game downloads and updates.

Managing Your Switch Game Storage
With your new microSD card installed, managing your game library becomes much easier.
Default Storage & Moving Games
- New Downloads: All newly downloaded games and updates will automatically save to your microSD card if one is inserted.
- Moving Existing Games: You cannot directly ‘move’ a game from internal storage to the microSD card (or vice-versa) in the traditional sense. Instead, you’ll need to archive the software from the internal memory and then re-download it. When you re-download, the Switch will prioritize saving it to the microSD card.
Archiving Games to Free Up Space
If your microSD card or internal storage starts to fill up, you can archive software to free up space without losing your save data. Save data is stored separately on the console’s internal memory and is not deleted when you archive a game.
To archive a game:
- From the HOME Menu, highlight the game you wish to archive.
- Press the ‘+’ button (or ‘-‘ button).
- Select ‘Manage Software’ > ‘Archive Software’.
- Confirm your choice.
The game icon will remain on your HOME Menu, but it will have a small cloud icon indicating it’s archived and can be re-downloaded at any time.
Checking Storage Space
You can always check your current storage status by navigating to:
- HOME Menu > System Settings > Data Management.
Here you can see how much space is used on your console’s internal memory and your microSD card, as well as manage save data, screenshots, and videos.
Conclusion
Investing in a good microSD card is one of the best upgrades you can make for your Nintendo Switch experience. By choosing the right card, installing it correctly, and understanding how to manage your digital library, you’ll ensure that you always have space for new adventures. Say goodbye to storage worries and hello to endless gaming fun!