


Best microSD card for Switch? Maximize game storage!

Why Your Nintendo Switch Needs a MicroSD Card
The Nintendo Switch, an incredibly versatile hybrid console, comes with a modest 32GB (or 64GB for the OLED model) of internal storage. While sufficient for a few small digital games or save data, this quickly becomes a bottleneck for avid gamers. Modern titles often demand gigabytes of space, and even physical game cartridges require some installation data and updates. A microSD card isn’t just an upgrade; it’s an essential expansion for maximizing your Switch’s game library and ensuring you never have to delete a beloved title to make room for a new adventure.

Understanding Switch MicroSD Card Compatibility
Before diving into recommendations, it’s crucial to understand what types of microSD cards your Nintendo Switch supports. The console is compatible with:
- microSD (2GB max): Obsolete for practical use.
- microSDHC (4GB – 32GB): Still too small for most modern needs.
- microSDXC (64GB – 2TB max): This is what you should be looking for. Currently, 1TB cards are the largest practically available and supported.
For optimal performance, the Switch utilizes the UHS-I (Ultra High Speed Phase I) interface. While UHS-II cards will technically work, they will only operate at UHS-I speeds, so there’s no performance benefit to the higher cost. Focus on UHS-I cards with good read/write speeds.
Key Factors When Choosing Your Switch MicroSD Card
1. Capacity: How Much Storage Do You Really Need?
This is often the first consideration. While 64GB might seem like a good starting point, it fills up remarkably fast. For most gamers, here’s a general guideline:
- 128GB – 256GB: Good for casual gamers or those who mostly buy physical games.
- 512GB: An excellent balance of cost and capacity for most digital game enthusiasts.
- 1TB: The ultimate choice for collectors and heavy digital downloaders who want to store a vast library without worry.
Remember, it’s always better to go slightly larger than you think you need, as game sizes tend to increase over time.

2. Speed: A1, A2, and UHS Ratings Explained
Speed directly impacts game loading times and overall system responsiveness. Look for cards with:
- UHS Speed Class 1 (U1) or 3 (U3): U3 offers faster minimum write speeds, which is beneficial but not strictly necessary for the Switch.
- Video Speed Class V10 or V30: Similar to U-ratings, indicating sustained write speeds.
- Application Performance Class A1 or A2: These ratings are crucial. A1 cards offer better random read/write speeds, optimized for running apps (like games) directly from the card. A2 cards are even faster, though the Switch’s hardware might not fully utilize the A2’s peak potential, an A2 card still provides excellent performance and future-proofing.
Aim for cards with a read speed of at least 90MB/s and an A1 or A2 rating for the best experience.
3. Brand Reliability and Authenticity
Always purchase from reputable brands and trusted retailers. Counterfeit microSD cards are unfortunately common and can lead to data corruption, slow performance, or misrepresented capacities. Stick to well-known manufacturers like SanDisk, Samsung, Lexar, and PNY.
Top MicroSD Card Recommendations for Nintendo Switch
Based on performance, reliability, and value, here are some excellent choices:
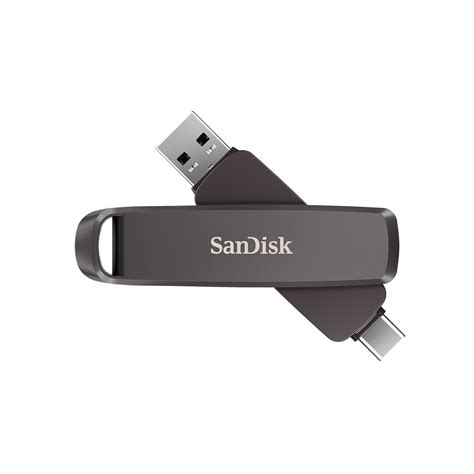
1. SanDisk microSDXC for Nintendo Switch
These are officially licensed by Nintendo, ensuring 100% compatibility and optimal performance. They come in various capacities (64GB, 128GB, 256GB, 512GB, 1TB) and often feature iconic Nintendo branding. They meet the A1 performance class and offer read speeds up to 100MB/s.
2. Samsung EVO Select / EVO Plus microSDXC
Samsung’s EVO series offers fantastic value and performance. The EVO Select (Amazon exclusive) and EVO Plus are generally A2-rated cards with read speeds up to 130MB/s (for A2 cards) or 100MB/s (for A1 cards). They are reliable and often available at competitive prices, making them a popular choice among Switch owners.
3. Lexar PLAY microSDXC
Designed for gaming, the Lexar PLAY cards are A1 or A2 rated with impressive read speeds up to 150MB/s. They offer a good balance of speed, capacity, and affordability, making them a strong contender for Switch storage expansion.
Installing and Managing Your MicroSD Card
Installing a microSD card is straightforward: simply open the kickstand on the back of your Switch and insert the card into the slot. The Switch will automatically recognize it. To transfer data from your internal storage to the microSD card:
- Go to System Settings > Data Management.
- You can archive software (delete the game data but keep the icon and save data) or manage data locations for new downloads.
Remember that game save data is always stored on the console’s internal memory and cannot be moved to the microSD card. Only downloadable software and screenshots/videos are stored on the card.
![Nintendo Switch [Articles] - IGN](/images/aHR0cHM6Ly90czQubW0uYmluZy5uZXQvdGg/aWQ9T0lQLmNVSFFMdjB3dVV3eUNpbHdtTk81QkFIYUhhJnBpZD0xNS4x.webp)
Conclusion: Game On with Expanded Storage
Investing in a high-quality microSDXC card is one of the best upgrades you can make for your Nintendo Switch. It eliminates storage anxiety, allows you to carry your entire digital library with you, and ensures smooth game loading. By choosing a card with ample capacity and appropriate speed ratings from a trusted brand, you’ll be well-equipped to maximize your Switch gaming experience for years to come. Happy gaming!


