


Best Switch storage: MicroSD tips for huge game libraries?

The Nintendo Switch has revolutionized portable gaming, offering an incredible library of titles from indie gems to massive AAA blockbusters. However, for many gamers, especially those who prefer digital downloads, the console’s internal storage quickly becomes a bottleneck. With only 32GB (or 64GB for the OLED model) of usable space, it doesn’t take long for your Switch to cry for more room.
The Nintendo Switch Storage Challenge
While the Switch offers fantastic portability and a vast eShop, its built-in memory is surprisingly small in today’s digital-heavy gaming landscape. Modern games, along with their updates and DLC, can easily consume several gigabytes each. For instance, a single title like The Legend of Zelda: Tears of the Kingdom can take up over 18GB, and other titles like Pokémon Scarlet/Violet or DOOM Eternal are equally demanding.
This limited space means that without external storage, you’ll constantly be deleting games to make room for new ones, leading to frustrating redownloads and lost save data if not managed carefully. Thankfully, there’s a simple and affordable solution: a microSD card.

Why MicroSD Cards Are Essential for Switch Gamers
Nintendo designed the Switch with expandability in mind, including a dedicated slot for microSD, microSDHC, or microSDXC cards. This allows you to vastly increase your storage capacity, ensuring you can keep dozens, if not hundreds, of games ready to play at a moment’s notice.
Unlike some other consoles where external storage can be slow or cumbersome, games stored on a properly chosen microSD card on the Switch perform almost identically to those on internal memory. This seamless integration makes a microSD card an absolute must-have accessory for any serious Switch owner, particularly those building a substantial digital library.
What to Look For in a Switch MicroSD Card
Not all microSD cards are created equal. To ensure optimal performance and value for your Switch, pay attention to these key specifications:
Capacity: How Much Do You Really Need?
- 128GB: A good starting point for casual gamers or those who mostly buy physical games. It offers enough space for about 5-10 large digital titles.
- 256GB: The sweet spot for most gamers. It provides ample room for a growing digital library without breaking the bank. You’ll likely fit 15-30 major games.
- 512GB: Ideal for avid collectors with huge digital libraries. This will likely cover dozens of games and updates for years to come.
- 1TB: For the ultimate digital hoarders. While more expensive, it virtually eliminates storage worries. Make sure your Switch model supports it (all models do, but check if you have an older card reader with issues, though rare).
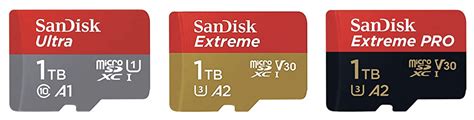
Speed Matters: Understanding UHS-I, A1, and A2
The Nintendo Switch supports UHS-I (Ultra High Speed Phase I) cards, with a maximum transfer rate of 104 MB/s. While faster UHS-II cards exist, the Switch cannot fully utilize their speed, so investing in them for the Switch is generally not cost-effective.
Look for these indicators:
- UHS Speed Class 3 (U3) or Video Speed Class V30: These indicate a minimum write speed of 30 MB/s, which is excellent for gaming.
- Application Performance Class A1 or A2: These ratings are crucial. A1 (1500 IOPS read, 500 IOPS write) and especially A2 (4000 IOPS read, 2000 IOPS write) signify better performance for running applications (like games) by optimizing for random read/write operations. While the Switch might not fully utilize A2’s peak, cards with this rating often come with faster overall speeds and better sustained performance.

Reliable Brands: Don’t Compromise on Quality
Stick with reputable brands like SanDisk, Samsung, Kingston, PNY, and Lexar. These companies are known for their reliability, consistent performance, and often offer good warranties. Avoid no-name brands or suspiciously cheap cards, as they can lead to corrupted data and slower loading times.
Top MicroSD Card Recommendations for Nintendo Switch
While specific models change, look for cards that fit the criteria above. SanDisk’s ‘Licensed for Nintendo Switch’ cards are a safe bet, often branded with recognizable Nintendo characters, and guarantee compatibility and good performance. However, any high-quality A1 or A2-rated UHS-I card from a reputable brand will work just as well.

Maximizing Your Huge Game Library: Practical Tips
Once you have your new microSD card, here are some tips to manage your expanding game collection:
Archiving vs. Deleting Games
The Switch allows you to ‘Archive’ software. This removes the game data from your console (or microSD card) but keeps the icon on your home screen and preserves your save data. You can redownload the game at any time from the eShop or by selecting its archived icon. ‘Deleting’ software removes everything, including save data (unless it’s backed up to the cloud via Nintendo Switch Online).
Physical vs. Digital Games Strategy
Consider a hybrid approach. Store larger, frequently played digital games on your microSD card. For games you might only play once or occasionally, consider buying physical cartridges to save valuable digital storage space. Keep in mind that even physical games often require updates and DLC that will take up space on your console or microSD card.
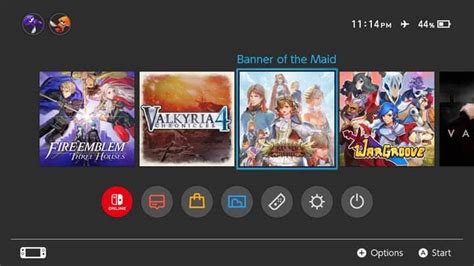
Organizing Your Home Screen
Utilize folders on your home screen to group similar games (e.g., ‘RPGs’, ‘Indies’, ‘Multiplayer’) to make finding titles easier, especially with a large library.

Installation and Setup: Getting Started
- Power Down: Always turn off your Nintendo Switch completely before inserting or removing a microSD card.
- Insert Card: Open the kickstand on the back of your Switch to reveal the microSD card slot. Gently push the card in until it clicks.
- Format (If prompted): Your Switch may prompt you to format the new card. Follow the on-screen instructions. This will erase any data already on the card, so ensure it’s empty.
- Transfer Data (Optional): If you’re upgrading from a smaller card, you can transfer your data. The easiest way is to copy all contents from the old card to your computer, then copy them to the new card. Alternatively, redownload games directly from the eShop onto the new card.
Conclusion: Game On, Worry-Free!
Investing in a high-quality microSD card is one of the best upgrades you can make for your Nintendo Switch. It frees you from the constant struggle of managing limited storage, allowing you to build and enjoy an expansive digital game library without interruption. With the right card and smart management tips, you can spend less time worrying about space and more time diving into the fantastic world of Switch gaming. Happy gaming!