

Effective DIY fixes for Nintendo Switch Joy-Con drift?
Understanding the Infamous Joy-Con Drift
Nintendo Switch Joy-Con drift is a frustratingly common issue where the controller registers input even when the joystick isn’t being touched, leading to phantom movements in games. This problem significantly detracts from the gaming experience, making precise control impossible. While Nintendo offers official repair services, many gamers opt for more immediate and cost-effective DIY solutions. Before you send your Joy-Cons off, let’s explore some effective fixes you can try at home, ranging from simple software adjustments to more involved hardware interventions.

Start with Software: Calibration and Updates
Sometimes, the issue isn’t hardware-related but rather a software glitch or miscalibration. This is the simplest fix to attempt first:
- Update Firmware: Ensure both your Nintendo Switch console and Joy-Cons are running the latest firmware. Go to System Settings > System > System Update.
- Calibrate Control Sticks: Navigate to System Settings > Controllers and Sensors > Calibrate Control Sticks. Follow the on-screen instructions to check and recalibrate both sticks. If the drift persists during calibration, it’s likely a hardware issue.
- Check for Input: In the same menu, there’s an option to “Test Input Devices.” Use this to see if the Joy-Con registers input when the stick is in its neutral position.
Non-Invasive Hardware Cleaning
Often, drift is caused by dust, debris, or grime accumulating under the joystick’s skirt, interfering with the internal sensors. These methods don’t require opening the Joy-Con:
Method 1: Compressed Air
- Power off your Switch.
- Lift the rubber skirt around the base of the problematic joystick gently.
- Use short bursts of compressed air to blow under the skirt. Hold the can upright to prevent propellant from spraying.
- Wiggle the joystick around while blowing to help dislodge any debris.
- Test again after a few minutes.
Method 2: Isopropyl Alcohol or Contact Cleaner
- Power off your Switch.
- Apply a tiny drop of 99% isopropyl alcohol or electronic contact cleaner (specifically designed for electronics, like WD-40 Specialist Contact Cleaner) to the base of the joystick, just under the rubber skirt.
- Work the joystick around in all directions for about 30 seconds to allow the liquid to penetrate and clean the contacts.
- Allow it to dry completely for at least 15-30 minutes before powering on and testing. This method helps dissolve grease and grime.

More Involved: Opening and Deep Cleaning
If non-invasive methods fail, you might need to open your Joy-Con. This requires small electronics tools and a steady hand. Proceed with caution, as this can void your warranty.
Tools You’ll Need:
- Tri-wing Y00 screwdriver
- Phillips #00 screwdriver
- Plastic spudger or pry tools
- Tweezers
- 99% Isopropyl alcohol and cotton swabs/pads
- Optional: Replacement joystick module
Steps:
- Remove Back Screws: Unscrew the four tri-wing screws on the back of the Joy-Con.
- Carefully Open: Gently pry open the back casing using a plastic spudger. Be mindful of the ribbon cables connecting the two halves.
- Disconnect Battery: Locate and carefully disconnect the battery connector. Remove the battery.
- Access Joystick: Unscrew the internal Phillips screws holding the joystick module in place (usually 1-3 screws). Gently lift the module.
- Clean Internals: With a cotton swab dampened with isopropyl alcohol, thoroughly clean around the base of the joystick mechanism, paying attention to the small metal contacts and the trackpad underneath the stick.
- Reassemble: Reverse the steps, ensuring all ribbon cables are securely reconnected and screws are tightened appropriately. Test calibration afterwards.

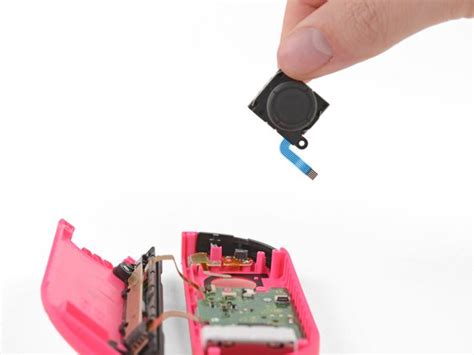
Replacing the Joystick Module
For persistent drift, the joystick’s internal potentiometers (the sensors that register movement) might be too worn out or damaged for cleaning alone. Replacing the entire joystick module is the most effective hardware fix, though it’s more advanced DIY.
Steps:
- Follow the steps above to open the Joy-Con and access the joystick module.
- Once the joystick module is unscrewed and its ribbon cable is carefully detached from the mainboard, lift it out.
- Insert the new replacement joystick module, ensuring its ribbon cable aligns correctly and snaps into place.
- Screw it back into position.
- Reassemble the Joy-Con.
- Calibrate the new joystick.
High-quality replacement modules, including those featuring Hall Effect sensors which are less prone to wear, are available online and can prevent future drift issues.
Preventative Measures and When to Seek Professional Help
To prolong the life of your Joy-Cons and minimize drift:
- Handle them gently; avoid excessive force on the joysticks.
- Keep them clean and free from dust and debris.
- Consider joystick caps that add a layer of protection.
If you’re uncomfortable opening your Joy-Cons or if the drift persists after trying these DIY methods, it might be best to contact Nintendo for official repair services or consult a professional electronics repair shop. DIY repairs carry the risk of further damage if not done carefully.

Conclusion
Joy-Con drift can be a major annoyance, but with a range of DIY fixes available, you don’t always have to resort to buying new controllers. From simple recalibrations and external cleaning to more involved internal cleaning or even module replacement, there’s a solution for many. Always proceed with caution when attempting hardware repairs, and remember that professional help is an option if DIY isn’t for you. Reclaim your gaming precision and enjoy your Nintendo Switch to its fullest!