


How to free up Nintendo Switch storage for new games & optimize SD card usage?
The Nintendo Switch is a fantastic console, but its limited internal storage (32GB for the original/Lite, 64GB for the OLED model) can quickly fill up, especially with large digital game downloads. Running out of space can be frustrating when a new game drops and you’re forced to make tough decisions about what to delete. This guide will walk you through the best strategies to manage your Switch’s storage and optimize your SD card usage.
Check Your Current Storage Status
Before you start deleting or archiving, it’s wise to know exactly what’s taking up the most space on your Nintendo Switch. This diagnostic step helps you prioritize what to remove.
- From the HOME Menu, go to System Settings.
- Scroll down the left-hand menu and select Data Management.
- Here you’ll find various options: Manage Software, Save Data Cloud, Screenshots and Videos, and Manage Data.
- Select Manage Software to see a detailed breakdown of how much space each game and application consumes. This is usually where you’ll find the biggest storage hogs.

Freeing Up Internal Storage
The most common culprit for dwindling storage is downloaded games and their associated updates. The Switch offers two primary ways to clear space from games: Archiving and Deleting.
Archiving Software
Archiving a game removes its core game data from your system, but keeps its icon on the HOME Menu and, crucially, preserves your save data. This is ideal if you plan to play the game again in the future, as you can easily re-download it from the eShop or your user page. Your progress will be intact.
- From Data Management > Manage Software, select the game you want to archive.
- Choose Archive Software.
- Alternatively, from the HOME Menu, highlight the game icon, press the + or – button, scroll down to Data Management, and select Archive Software.

Deleting Software
Deleting software removes the game’s core data and its icon from the HOME Menu. Like archiving, it also preserves your save data. Choose this if you’re certain you don’t want the game icon cluttering your HOME Menu and prefer to re-download it from scratch if you ever want to play it again.
- Follow the same steps as archiving, but select Delete Software instead.
Managing Save Data
While game data can be massive, save data files are typically very small, often only a few megabytes. Unfortunately, you cannot selectively move save data to an SD card. Deleting save data is generally not recommended unless you are absolutely certain you will never play that game again, as it cannot be recovered once deleted (unless you have a Nintendo Switch Online subscription with Cloud Saves enabled for that particular game).
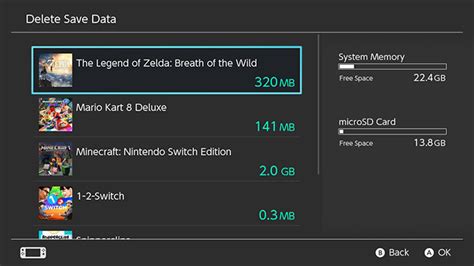
- From System Settings > Data Management, select Delete Save Data.
- Be extremely careful and confirm your choice, as this action is irreversible.
Clearing Screenshots and Videos
Depending on how many epic moments or hilarious mishaps you’ve captured, your screenshot and video gallery can consume a surprising amount of space, especially if you record full 30-second clips regularly.
- From System Settings > Data Management, select Manage Screenshots and Videos.
- You can then delete individual items, delete all items on the system memory, or delete all items on the microSD card.
- Consider backing them up to a PC, smartphone (via QR code transfer), or social media first before permanent deletion.

Optimizing SD Card Usage
The best long-term solution for Nintendo Switch storage limitations is investing in a high-capacity microSD card. The Switch supports microSD, microSDHC, and microSDXC cards up to a theoretical 2TB (though 1TB is currently the largest commercially available).
Choosing the Right SD Card
Look for cards with a high read/write speed (UHS-I compatible with a speed class of 10 or higher is recommended) and a generous capacity. For serious digital collectors, a 256GB or 512GB card is a good starting point, while 1TB cards offer maximum peace of mind. Faster cards can slightly reduce loading times for games installed on them.
Setting SD Card as Default Download Location
Once a formatted microSD card is inserted, your Switch will automatically prioritize it for new game downloads, assuming it has sufficient space. You don’t usually need to manually set a default location.
- Simply insert the formatted microSD card into the slot located under the kickstand on the back of the Switch console.
- New game downloads and software updates will automatically install to the SD card first. If the SD card fills up, the Switch will then utilize the internal system memory.

Moving Existing Games to SD Card (Indirectly)
The Nintendo Switch doesn’t have a direct “move game from internal to SD card” function. However, you can achieve this indirectly with a little effort:
- Archive or Delete the game from internal storage. (As described above, your save data will remain on the system memory).
- Re-download the game from the Nintendo eShop or your user page (under your profile icon > Redownload).
- With the SD card inserted, the game will now install directly onto the SD card, effectively moving it from internal storage.
- This method is a bit more time-consuming due to the download process but is effective for migrating specific titles.
Best Practices for Storage Management
- Buy Physical When Possible: Physical game cartridges reduce the need for large digital downloads, saving your internal and SD card storage for digital-only titles and updates.
- Regularly Review Storage: Periodically check your Data Management settings to keep an eye on what’s consuming space. Delete or archive games you rarely play.
- Back Up Media: Regularly transfer screenshots and videos to a computer, cloud service, or social media to keep your console’s storage clear.
- Invest in a Large SD Card Early: It’s often more cost-effective and certainly less hassle to buy a larger capacity microSD card initially than to upgrade and transfer data later.
Conclusion
By understanding how your Nintendo Switch manages data and utilizing both the archiving feature and a high-capacity microSD card, you can ensure you always have room for the next big adventure. With a little proactive management, you’ll spend less time deleting and more time gaming!


