


How to fix Nintendo Switch Joy-Con drift without replacement?
Joy-Con drift is a frustratingly common problem for many Nintendo Switch owners, causing characters or cursors to move autonomously even when the analog sticks are not being touched. While replacing the Joy-Cons is an option, it can be expensive. Fortunately, several methods can often resolve drift without having to buy new controllers. This article will guide you through various troubleshooting and DIY repair steps to get your Joy-Cons working correctly again.
Understanding Joy-Con Drift
Before diving into fixes, it’s helpful to understand what causes drift. Most commonly, it’s due to wear and tear on the internal components of the analog stick, specifically the potentiometers that register movement. Over time, dust, debris, and microscopic wear particles can accumulate beneath the stick, interfering with the electrical contacts and sending erroneous signals to the Switch. Less frequently, it can be a software glitch or a manufacturing defect.
Initial Software Solutions
Sometimes, the issue isn’t physical but rather a software miscalibration. These steps are quick and easy to perform and should always be your first attempt at fixing drift.
Update Your Nintendo Switch Firmware
Ensure your Nintendo Switch system is running the latest software version. Updates often include bug fixes and improvements that can sometimes resolve controller issues. Go to System Settings > System > System Update.
Calibrate Control Sticks
Recalibrating your Joy-Cons can often fix minor drift issues by resetting their neutral position. Here’s how:
- From the HOME Menu, select System Settings.
- Scroll down the menu on the left and select Controllers and Sensors.
- Select Calibrate Control Sticks.
- Press down on the Joy-Con stick you wish to calibrate.
- Follow the on-screen prompts. If the stick is drifting, you’ll likely see the crosshairs moving without input.
- If prompted to calibrate, follow the instructions to test its range of motion and center position.
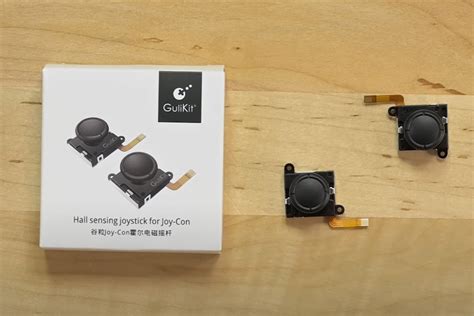
Cleaning the Analog Sticks (The DIY Approach)
If software solutions don’t work, dust and debris are likely the culprits. Cleaning the inside of the analog stick can be surprisingly effective. You’ll need a few items: a can of compressed air, and ideally, an electrical contact cleaner (such as WD-40 Specialist Contact Cleaner, not regular WD-40) or 90%+ isopropyl alcohol, along with cotton swabs.

Method 1: Using Compressed Air
This is the least invasive physical fix. Hold the Joy-Con with the analog stick facing upwards. Gently lift the rubber skirt around the base of the stick (you might need a very thin tool like a spudger or a fingernail). While holding the skirt up, spray short bursts of compressed air into the gap from different angles. Wiggle the stick around to help dislodge any trapped particles.
Method 2: Using Electrical Contact Cleaner or Isopropyl Alcohol
This method goes a step further and is often more effective. **Caution: Use sparingly and ensure the product is suitable for electronics. Avoid harsh chemicals.**
- Turn off your Nintendo Switch and detach the Joy-Cons.
- Again, gently lift the rubber skirt around the base of the drifting analog stick.
- Apply a tiny amount (one or two small sprays or a drop from a cotton swab dipped in isopropyl alcohol) of electrical contact cleaner directly into the exposed gap under the skirt.
- Immediately after applying, rapidly rotate and click the analog stick in all directions for about 30-60 seconds. This helps distribute the cleaner and work out any debris.
- Allow the Joy-Con to dry completely (at least 15-30 minutes for contact cleaner, less for isopropyl alcohol which evaporates quickly) before reattaching it to the Switch or turning the console back on.
- Repeat the calibration steps from the software solutions section.

Advanced Troubleshooting & When to Seek Professional Help
If the above methods fail, the internal components might be more severely worn or damaged. In such cases, replacing the analog stick module (a more involved DIY repair requiring tools and technical skill) or sending it for professional repair are the next steps. Nintendo offers a repair service for Joy-Con drift, often free of charge, even out of warranty, depending on your region and the specific circumstances. It’s always worth checking Nintendo’s official support website for their current repair policies.

Preventing Future Drift
While drift can sometimes be unavoidable, you can take steps to minimize its occurrence:
- Gentle Use: Avoid excessive force or ‘mashing’ the analog sticks.
- Protective Covers: Silicone covers can help prevent dust and grime from entering the crevices around the stick.
- Regular Cleaning: Periodically use compressed air to clear dust from around the stick bases.
- Storage: When not in use, store your Switch in a clean, dust-free environment or a carrying case.
![How To Fix Joy-Con Drift: A Simple Guide + Tips [2023] - TrendRadars](/images/aHR0cHM6Ly90czEubW0uYmluZy5uZXQvdGg/aWQ9T0lQLkp1VXFrTDZmSUpfaHUtbEJiU2NfS1FIYUU4JnBpZD0xNS4x.webp)
Conclusion
Joy-Con drift can be a major nuisance, but it doesn’t always necessitate buying new controllers. By trying software recalibration and careful cleaning techniques, many users can successfully resolve the issue themselves. Remember to proceed with caution when using any liquids or tools. If all else fails, consider Nintendo’s repair services or a professional repair shop as a last resort before purchasing new Joy-Cons.


