
How to free Nintendo Switch storage for more digital games?

Conquering the Storage Crunch on Your Nintendo Switch
The Nintendo Switch, with its vast library of fantastic digital titles, can quickly fill up its internal storage. Whether you own the original Switch, the Lite, or the OLED model, managing your storage is key to avoiding that dreaded “insufficient space” message. Don’t let a full console prevent you from downloading your next adventure! Here’s a comprehensive guide to freeing up precious gigabytes for more digital games.
1. Understand Your Storage Situation
Before you start deleting, it’s good to know exactly what’s taking up space. Your Switch has 32GB (original/Lite) or 64GB (OLED) of internal storage, but a significant portion is reserved for the system itself. Many users also have a microSD card installed, which vastly expands capacity.
How to Check Your Storage:
- From the HOME Menu, select System Settings.
- Scroll down and select Data Management.
Here, you’ll see a breakdown of your internal memory and any inserted microSD card, showing how much space is used by software, save data, screenshots/videos, and update data.
2. Archive or Delete Software (Games)
This is often the most effective way to reclaim large chunks of space. The Switch offers two options for removing games: archiving and deleting.
Archiving Software:
When you archive a game, the game software itself is removed from your system, but its save data remains. This is ideal if you think you might want to play the game again later, as you can re-download it from the eShop or your user page without losing your progress.
Deleting Software:
Deleting software removes both the game and its save data. Only do this if you are absolutely sure you won’t need the game or its progress ever again, or if your save data is backed up via Nintendo Switch Online’s Cloud Save feature.
How to Archive or Delete:
- From the HOME Menu, highlight the game you wish to manage.
- Press the + button (or the – button).
- Select Data Management, then choose either Archive Software or Delete Software.
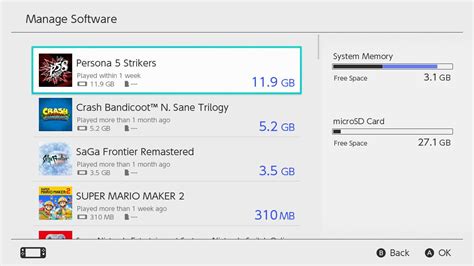
You can also go to System Settings > Data Management > Manage Software to see a list of all your installed games and their sizes, allowing you to prioritize what to remove.

3. Invest in a MicroSD Card
For any serious digital game collector, a microSD card is not just recommended, it’s virtually essential. The Switch supports microSD, microSDHC, and microSDXC cards up to 2TB (though 256GB, 512GB, or 1TB are more common and practical).
Why a MicroSD Card is Crucial:
- Significantly expands storage capacity.
- New digital game downloads will automatically install to the microSD card if available.
- Many physical game cartridges still require large downloads, which can also go to the microSD card.
Installing a MicroSD Card:
Simply open the stand on the back of your Switch and insert the microSD card into the slot with the label facing up. The system will recognize it automatically.
4. Manage Screenshots and Video Captures
Those epic in-game moments you captured can add up! Screenshots and videos, especially longer video clips, can consume a surprising amount of storage.
How to Manage Media:
- From the HOME Menu, select the Album icon.
- You can view individual captures and delete them one by one.
- To manage them in bulk or transfer them, go to System Settings > Data Management > Manage Screenshots and Videos.
If you have a microSD card, you can move your captures from internal memory to the card to free up space. You can also delete multiple captures at once from this menu.

5. Understand Save Data & Cloud Saves
Nintendo Switch game save data is relatively small and always stored on the console’s internal memory. It cannot be moved to a microSD card or deleted separately from the game itself (unless using specific data management options for “Delete Save Data”).
Nintendo Switch Online Cloud Saves:
While cloud saves are excellent for backing up your progress and transferring it between consoles, they do not free up storage on your Switch itself. Your save data remains on the internal memory even if it’s backed up to the cloud. You can manage cloud save data from System Settings > Data Management > Save Data Cloud.
Conclusion
By regularly checking your storage, making smart choices between archiving and deleting, and utilizing a microSD card, you can ensure your Nintendo Switch always has room for new adventures. A little proactive data management goes a long way in enhancing your gaming experience!