


Best microSD card for Switch: how to store many games & boost load times?

Why Your Nintendo Switch Needs a microSD Card
The Nintendo Switch, with its fantastic library of games, offers a mere 32GB (or 64GB for the OLED model) of internal storage. Given that many digital titles can easily exceed 10-20GB, and physical game cartridges still often require significant data downloads, this internal space fills up incredibly fast. A high-quality microSD card isn’t just a luxury; it’s an essential upgrade to truly enjoy your Switch experience, allowing you to store a vast collection of games and even potentially improve game loading times.

Key Factors When Choosing a Switch microSD Card
Not all microSD cards are created equal, especially when it comes to gaming. Here are the critical aspects to consider:
1. Capacity: How Much Space Do You Really Need?
- 128GB: A good starting point for casual gamers or those who primarily buy physical cartridges. It offers decent room for several large digital titles.
- 256GB: The sweet spot for most gamers. It provides ample space for a substantial digital library without breaking the bank.
- 512GB: Ideal for avid collectors who download many games, including larger AAA titles and indie gems. You’ll rarely worry about storage.
- 1TB: For the ultimate digital hoarder. While more expensive, it offers virtually unlimited space for years of gaming.
Remember, it’s often better to go slightly larger than you think you need, as game sizes continue to grow.
2. Speed: Boosting Load Times and Performance
Speed is crucial for smooth gameplay and faster loading. Look for these specifications:
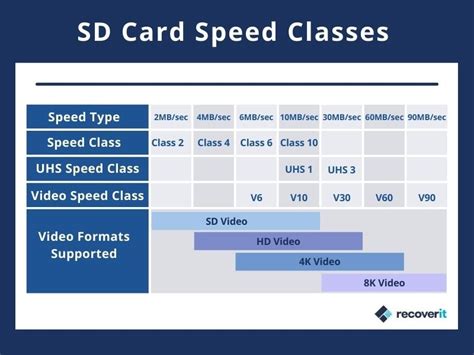
- UHS-I (Ultra High Speed – Phase I): The Nintendo Switch only supports UHS-I cards, so don’t overspend on UHS-II or UHS-III cards, as you won’t get the performance benefits.
- Speed Class (U1 or U3): U3 cards (30 MB/s minimum write speed) are generally preferred over U1 (10 MB/s minimum write speed) for optimal game performance, especially for larger games with many assets.
- Application Performance Class (A1 or A2): While the Switch doesn’t explicitly leverage A2’s enhanced capabilities to their fullest, both A1 and A2 cards offer superior random read/write speeds, which are vital for game loading and saving. An A1 or A2 rating ensures a smoother experience than older, non-A-rated cards.
A card with a U3 and A1/A2 rating will provide the best balance of speed and compatibility for your Switch.
3. Brand Reliability
Stick with reputable brands known for quality and consistency. SanDisk, Samsung, Lexar, and Western Digital are industry leaders. While cheaper, off-brand cards might be tempting, they often come with a higher risk of data corruption, slower actual speeds, and shorter lifespans.
Top Recommended microSD Cards for Nintendo Switch
Based on performance, reliability, and value, here are some of the best choices:
- SanDisk Extreme / Extreme Pro: Often considered the gold standard. They offer excellent U3 and A2 performance, ensuring fast load times and reliable data handling. They are also officially licensed by Nintendo (look for the Nintendo-branded versions).
- Samsung EVO Select / EVO Plus: Great value cards that deliver strong U3 and A2 performance. They are reliable and often come at a competitive price point.
- Lexar Play: Specifically designed for gaming and mobile devices, these cards offer U3 and A2 ratings, making them an excellent choice for the Switch.

How to Install Your microSD Card
- Power Off: Completely power down your Nintendo Switch (hold the power button for a few seconds and select ‘Power Options’ > ‘Turn Off’).
- Locate Slot: Flip up the kickstand on the back of your Switch to reveal the microSD card slot.
- Insert Card: Insert the microSD card with the label facing the same direction as the Switch’s screen, pushing it gently until it clicks into place.
- Power On: Turn your Switch back on. The console should recognize the new storage.
- Format (if prompted): The Switch may prompt you to format the card. Follow the on-screen instructions.
Maximizing Your Storage and Load Times
Once your microSD card is in, the Switch will automatically prioritize installing new digital games and updates to the card. You can also manually move existing data:
- Go to System Settings > Data Management.
- Here you can check your free space, archive software to free up space (which deletes the game data but keeps the icon and save data), or delete software.
- To move games from internal storage to the microSD card, you’ll generally need to delete the game from internal storage and then redownload it, which will then install to the microSD card. Save data is always stored internally and cannot be moved.

Conclusion
Upgrading your Nintendo Switch with a high-quality microSD card is one of the best investments you can make to enhance your gaming experience. By choosing a card with ample capacity, a U3 speed class, and an A1 or A2 application performance rating from a reputable brand, you’ll ensure plenty of space for your ever-growing game library and enjoy smoother, faster load times for all your favorite titles. Don’t let limited storage hold back your gaming adventures!


